A következő címkéjű bejegyzések mutatása: HPCompaqTC4400. Összes bejegyzés megjelenítése
A következő címkéjű bejegyzések mutatása: HPCompaqTC4400. Összes bejegyzés megjelenítése
2018. január 17.


2017. november 27.
Share clipboard and drag&drop between VirtualBox host and guest
- install VirtualBox guest additions
- open Machine > Settings... (Host+S key)
- open General > Advanced tab
- set Shared Clipboard and Drag'n'Drop to bidirectional
2017. november 5.
2017. augusztus 6.
How to get the RSS feed out of iTunes?
I found the solution here: https://superuser.com/questions/78415/get-rss-feed-from-itunes-podcast-links
It is to use this website to extract the RSS feed for you: http://itunes.so-nik.com/
It is to use this website to extract the RSS feed for you: http://itunes.so-nik.com/
2017. augusztus 5.
How to completely remove Plex Media Server?
Source: https://support.plex.tv/hc/en-us/articles/201941078-Uninstall-Plex-Media-Server
- Shut down Plex Media Server
service plexmediaserver stop - Remove the installed package
dpkg -r plexmediaserver - Remove the library directory of plex
rm -R /var/lib/plexmediaserver/Library/Application Support/Plex Media Server/
sudo mkdir /var/lib/plexmediaserver
sudo addgroup plex
sudo adduser plex plex
sudo chown plex:plex /var/lib/plexmediaserver2017. június 22.
Scanimage produces unreadable lineart image with default settings
Compared to Ubuntu 12.04 and the default settings for Canon LiDE 210 flatbed scanner changed in Ubuntu 16.04.
The default result of a Lineart scan was unacceptable (unreadable).
It turned out, that --resolution was 75, and --disable-dynamic-lineart was no.
Setting options '--disable-dynamic-lineart=yes --resolution 300' for '--mode Lineart' solved the problem.
The default result of a Lineart scan was unacceptable (unreadable).
It turned out, that --resolution was 75, and --disable-dynamic-lineart was no.
Setting options '--disable-dynamic-lineart=yes --resolution 300' for '--mode Lineart' solved the problem.
2017. június 16.
Finding the rightful heir to HP Compaq TC-4400 tablet PC
Finding an affordable business class tablet PC with pen support is not easy nowadays.
Here are some sites that might help with finding something with pen support:
Here are some sites that might help with finding something with pen support:
- JBA's List of Digitizer Pens and Table
- TabletPCReview forum's List of Windows 10 tablets and convertibles with stylus
- TabletPCReview forum's List of Windows 8 and RT tablets and convertibles with stylus
2017. június 11.
Migrating from Ubuntu 12.04 LTS to 16.04 LTS on HP Compaq TC4400 Tablet PC
Setting up Xenial is very similar to setting up Trusty.
First of all, I install synaptic and gdebi, because I don't like the Ubuntu Store thingy:
First of all, I install synaptic and gdebi, because I don't like the Ubuntu Store thingy:
- sudo apt-get install synaptic gdebi
Then get back the Gnome Classic look:
- sudo apt-get install gnome-session-flashback
- log out to change the window manager by clicking on the icon next to your user name then login again.
Then set up gnome-session-flashback with Compiz
- Add something to the panel: Alt+Super + Right click
- Set number of workspaces:
- sudo apt-get install compizconfig-settings-manager
- in Compiz Config Settings Manager navigate to General / General Options / Desktop Size set the size you want.
- Change date-time format on panel
- sudo apt-get install dconf-editor
- in Dconf Editor navigate to com > canonical > indicator > datetime
- Set "time-format" to "custom"
- Set "custom-time-format" to the format you want, i.e. %Y-%m-%d %H:%M:%S
- Make sure that "show-clock" is check-marked.
- Change the Indicator App on the panel to show less
- Gnome Session Flashback installs indicator-applet-complete, but there are more then one indicator applet that can be downloaded with synaptic. The difference between them is this:
- indicator-applet-complete is: messaging applications, power settings, bluetooth settings, network settings, sound settings, date and time settings, user accounts, session management
- indicator-applet is: messaging applications, power settings, bluetooth settings, network settings, sound settings
- indicator-applet-session is: user accounts, session management
- indicator-applet-appmenu is: your active application's menu header
- Other settings can be changed in the Dconf Editor under com > canonical > indicator. (i.e. turn off the language icon)
- Turn off effects:
- in Compiz Config Settings Manager navigate to Effects and turn off Animations
- Set Nautilus (Files) default view to List
- follow instructions here.
- Make .sh files run on double click
- follow instructions here.
Creating searchable PDFs on Ubuntu 3rd try
Following up on the second try:
Set up Tesseract:
Tesseract supported input image formats:
...are the ones supported by Leptonica:
JPEG, PNG, TIFF, BMP, PNM ,GIF, WEBP, JP2
Tesseract searchable pdf output
Example usage with specified language (-l):
Results:
My requirements:
- image layer over text layer
- good character encoding for Hungarian ű and ő chars
- good placement of words and lines
- fair enough good recognition
- handling more column layout
Tesseract:
Set up Tesseract:
sudo apt-get install tesseract-ocr- from https://github.com/tesseract-ocr/tessdata download the language data you need and put it in tessdata directory (
/usr/share/tesseract-ocr/tessdata). E.g. for Hungarian:
cd /usr/share/tesseract-ocr/tessdata

sudo wget https://github.com/tesseract-ocr/tessdata/raw/master/hun.traineddata - add environmental variable
TESSDATA_PREFIXto the directory containing the tessdata directory if you get the error that the language data cannot be found.
Tesseract supported input image formats:
...are the ones supported by Leptonica:
JPEG, PNG, TIFF, BMP, PNM ,GIF, WEBP, JP2
Tesseract searchable pdf output
Example usage with specified language (-l):
tesseract input.png outbase -l hun pdfResults:
- image layer over text layer - YES
- good character encoding for Hungarian ű and ő chars - YES
- good placement of words and lines - YES
- fair enough good recognition - YES: it depends a lot on input quality.
- handling more column layout - SO-SO: sometimes works (i.e. half page is OK, other half is single column)
This is good enough for me now, so I'm not investigating further.
Set nautilus default view to list
I have no idea how to open this 'Edit > Preferences' window in the gnome flashback, but the dconf editor version worked for me:
- Open dconf Editor
- Navigate to org.gnome.nautilus.preferences
- Set the 'default-folder-viewer' to 'list_view'
- Optionally: Navigate to org.gnome.nautilus.list-view
- Set the 'default-zoom-level' to 'smaller'
- Set the 'use-tree-view' to true
2017. május 28.
Ubuntu Firewall
UFW (Uncomplicated Firewall) comes with Ubuntu preinstalled, but it is disabled by default:
Then you'll have to allow specific ports for some applications.
For example, to allow the default port of Transmission Bittorrent Client:
Another way to allow ports for an application is to create an application profile and allow that profile.
For example to allow Plex Media Server:
The solution for Plex Media Server profile was originally posted on Plex Forum.
Some other useful commands:
List all rules (with reference number):
sudo ufw enableThen you'll have to allow specific ports for some applications.
For example, to allow the default port of Transmission Bittorrent Client:
sudo ufw allow 51413Another way to allow ports for an application is to create an application profile and allow that profile.
For example to allow Plex Media Server:
- Edit (create) the app profile:
sudo gedit /etc/ufw/applications.d/PlexMediaServer - Paste the following in it:
[PlexMediaServer] title=Plex Media Server description=This opens up PlexMediaServer for http (32400), upnp, and autodiscovery. ports=32469/tcp|32413/udp|1900/udp|32400/tcp|32412/udp|32410/udp|32414/udp - Allow the profile:
ufw allow PlexMediaServer
The solution for Plex Media Server profile was originally posted on Plex Forum.
Some other useful commands:
List all rules (with reference number):
sudo ufw status numberedsudo ufw delete 1sudo ufw delete allow 514132017. április 6.
How to make .sh files run on double click?
In Ubuntu 16.04 LTS unlike in previous LTSs executable shell script files when double clicked open automatically for editing instead of seeing a popup asking what to do with them.
To restore the confirmation popup do as it is said in this askubuntu post: make sure your file manager supports executing files:
To restore the confirmation popup do as it is said in this askubuntu post: make sure your file manager supports executing files:
$ gsettings set org.gnome.nautilus.preferences executable-text-activation ask- Open dconf Editor
- Navigate to org.gnome.nautilus.preferences
- Set the 'executable-text-activation' to 'ask'
2017. február 19.
Installing Ubuntu 16.04 LTS Xenial Xerus
I ran into a couple of problems while trying to install the new LTS on my HPQ TC4400 laptop.
It had the 12.04 LTS installed, and had the home directory on a separate partition.
1. problem: no booting from pendrive
I tried different pendrives (2, 4, 8 GB), different USB slots (there are 3 on my machine) and different Ubuntu versions (12.04, 14.04, 16.04).
The problem I ran into is this:
gfxboot.c32: not a COM32R image
So first I tried to create startup disks on my desktop 12.04 on different pendrives with 16.04 and 14.04 images. They all resulted in this error. I went with the "live" command for 16.04. But one pendrive did not even start up the live session, while another did. Once I was in live, I tried to install 16.04, with the same distribution of the hard drives as I had before. It seemed to be okay. However when I started it and logged in, the system never loaded. Instead I got this disrupted background image flashing in different resolutions for until I had enough and turned off the machine.
Next I tried creating the startup discs on the 16.04 live session. The 14.04 pendrive booted alright compared to the one created on 12.04, but then the installation failed, and then booting also wasn't smooth anymore.
Next I reinstalled the 12.04, however it had issues with settings already existing on the home partition. The system did not load properly throwing errors in ma face.
Luckily I just got a spare 500GB hard drive, switched it with the old one and went again for 16.04 with the strange boot interface typing "live" in, and then installing from the live session.
It turned out okay so far.
My conclusion is that the settings in the home partition somehow interfered with the newly installed OSs, but really I have no clue what happened and why.
It had the 12.04 LTS installed, and had the home directory on a separate partition.
1. problem: no booting from pendrive
I tried different pendrives (2, 4, 8 GB), different USB slots (there are 3 on my machine) and different Ubuntu versions (12.04, 14.04, 16.04).
The problem I ran into is this:
gfxboot.c32: not a COM32R image
So first I tried to create startup disks on my desktop 12.04 on different pendrives with 16.04 and 14.04 images. They all resulted in this error. I went with the "live" command for 16.04. But one pendrive did not even start up the live session, while another did. Once I was in live, I tried to install 16.04, with the same distribution of the hard drives as I had before. It seemed to be okay. However when I started it and logged in, the system never loaded. Instead I got this disrupted background image flashing in different resolutions for until I had enough and turned off the machine.
Next I tried creating the startup discs on the 16.04 live session. The 14.04 pendrive booted alright compared to the one created on 12.04, but then the installation failed, and then booting also wasn't smooth anymore.
Next I reinstalled the 12.04, however it had issues with settings already existing on the home partition. The system did not load properly throwing errors in ma face.
Luckily I just got a spare 500GB hard drive, switched it with the old one and went again for 16.04 with the strange boot interface typing "live" in, and then installing from the live session.
It turned out okay so far.
My conclusion is that the settings in the home partition somehow interfered with the newly installed OSs, but really I have no clue what happened and why.
2016. szeptember 22.
Share network between VirtualBox Ubuntu 16.04 Guest and Windows 10 Host
When you create a new VirtualBox image, the networking will be set to NAT, which is good for reaching the internet.
However, when you want to reach the network if the Host OS, you'll have to set the Network Setting to Bridged Adapter.
Open VirtualBox --> right click on the image --> Settings --> Network -->
set "Attached to" to Bridged Adapter.
I only investigated afterwards, but I managed to reach the Host's http://localhost/ from the Guest by connecting to the Ethernet IPv4 address of the host.
On the windows host, open the command line, and run
Read more on VirtualBox networking modes.
However, when you want to reach the network if the Host OS, you'll have to set the Network Setting to Bridged Adapter.
Open VirtualBox --> right click on the image --> Settings --> Network -->
set "Attached to" to Bridged Adapter.
I only investigated afterwards, but I managed to reach the Host's http://localhost/ from the Guest by connecting to the Ethernet IPv4 address of the host.
On the windows host, open the command line, and run
ipconfig here you'll find your Ethernet IPv4 address. Run something on localhost, and you should now reach the site from the Guest on this ip address.Read more on VirtualBox networking modes.
2016. július 15.
Shared Folders setup on Ubuntu 16.04 as a VirtualBox Guest
- On Ubuntu 18.04 guest with VirtualBox 6.0.8: install build tools first:
- sudo apt-get install build-essential gcc make perl dkms
- reboot
- Install the Virtual Box Guest Addition
- from vbox menu: "Devices" --> Insert Guest Addition CD Image...
- If you get "failed to connect to the virtualbox kernel service access denied" error message after reboot or in the future:
- Eject the VBOXGUESTADDITION CD image from Ubuntu
- Reinsert the image from the vbox menu.
- Add Shared Folders in vbox menu "Devices" --> Shared Folders --> Shared Folders Settings
- check the checkboxes that apply to your needs.
- the following part of the tutorial assumes you checked Auto-mount and Make Permanent options.
- Add yourself to the VBOXSF user group
- A) install gnome-system-tools to get a graphical user interface for that, and then run users-admin from the terminal or "Users and Groups" from menu.
- B) use the command line:
sudo usermod -aG vboxsf userName - Now, your shared folder should be mounted with the "sf_" prefix.
If something does not happen at once, then do a reboot.
Sources:
- https://help.ubuntu.com/community/VirtualBox/SharedFolders
- http://www.howtogeek.com/187703/how-to-access-folders-on-your-host-machine-from-an-ubuntu-virtual-machine-in-virtualbox/
- http://askubuntu.com/questions/456400/why-cant-i-access-a-shared-folder-from-within-my-virtualbox-machine
- http://askubuntu.com/questions/642991/virtualbox-ubuntu-14-04-vboxclient-the-virtualbox-kernel-service-is-not-runnin
- https://askubuntu.com/questions/161759/how-to-access-a-shared-folder-in-virtualbox
2016. január 19.
Out of 4GB RAM only 3.3GB is usable
Yesterday I bought a 2GB RAM to upgrade my HPQ TC4400 to the maximum allowed memory: 4GB. Before that I had 2+1GB installed, showing up as 2.9GB.
This 2+2GB RAM however shows up only as 3.3GB. Wow. Only 0.4GB increase. So I started to look around for the WHY?!?
Probably useful links:
Another important note is that the BIOS is already the latest (Version: 68YHV Ver. F.0C; Release Date: 07/09/2008); It does not have an option for Memory Hole Remapping; The processor is Intel Pentium M Core2 CPU T5600 @ 1.83GHz and it does have a PAE (Physical address extension) flag (according to dmidecode).
I definitely have a 64-bit operating system, so the limitation cannot be due to a 32-bit OS.
The maximum capacity is 4GB:
I do have 4GB installed:
However, there is only ~3.3GB available:
Free shows the same:
DMSG log has more detailed info:
There is something else interesting in /var/log/dmesg (opened it with gedit)
The same information can be found here:
And then, 'smem' shows that there is ~700K reserved for the firmware/hardware... but WHY? (the "Used" amount sums up to 4194304 below)
In comparison, when 3GB memory is in the machine, the numbers are like this:
I also tried running Ubuntu from an USB pendrive, but it shows the same amount of memory. And I tried running Windows 7, and this also shows only 3,3GB.
According to this article (http://duartes.org/gustavo/blog/post/getting-physical-with-memory/), "some of the physical memory range in an Intel computer is mapped to devices like hard drives and network cards instead of actual RAM memory. This allows drivers to communicate with their devices by writing to and reading from memory. The kernel marks these memory regions as uncacheable in the page tables." Then in the article about the Memory Map (http://duartes.org/gustavo/blog/post/motherboard-chipsets-memory-map/) it is said that "this mapping of memory addresses away from RAM modules causes the classic hole in PC memory between 640KB and 1MB. A bigger hole arises when memory addresses are reserved for video cards and PCI devices." "The diagram below shows a typical memory map for the first 4 gigs of physical memory addresses in an Intel PC:"
 Then it is said that "the CPU mode determines how much physical memory can be accessed. For example, if the CPU is running in 32-bit mode, then it is only capable of physically addressing 4 GB (well, there is an exception called physical address extension, but ignore it for now). Since the top 1 GB or so of physical addresses are mapped to motherboard devices the CPU can effectively use only ~3 GB of RAM. [...] On the other hand, a CPU running in 64-bit mode can physically access 64GB (few chipsets support that much RAM though). In 64-bit mode it is possible to use physical addresses above the total RAM in the system to access the RAM regions that correspond to physical addresses stolen by motherboard devices. This is called reclaiming memory and it’s done with help from the chipset."
My conclusion is that there is no way to access all the 4GB of memory as RAM.
This 2+2GB RAM however shows up only as 3.3GB. Wow. Only 0.4GB increase. So I started to look around for the WHY?!?
Probably useful links:
- There is actually a post about TC4400 here: http://forum.notebookreview.com/threads/tc4400-only-recognizes-3447mb-in-windows.225619/ It concludes that it was Windows' fault, and it needed an upgrade.
- More useful info for linux: http://superuser.com/questions/453201/only-3-2gb-of-4gb-ram-detected-on-64-bit-debian
- Here they suggest to reinstall the 64-bit system: http://askubuntu.com/questions/32272/why-does-ubuntu-only-show-3gb-of-ram
Another important note is that the BIOS is already the latest (Version: 68YHV Ver. F.0C; Release Date: 07/09/2008); It does not have an option for Memory Hole Remapping; The processor is Intel Pentium M Core2 CPU T5600 @ 1.83GHz and it does have a PAE (Physical address extension) flag (according to dmidecode).
I definitely have a 64-bit operating system, so the limitation cannot be due to a 32-bit OS.
~$ uname -a
Linux 3.13.0-74-generic #118~precise1-Ubuntu SMP Fri Dec 18 10:38:55 UTC 2015 x86_64 x86_64 x86_64 GNU/Linux
The maximum capacity is 4GB:
~$ sudo dmidecode --type 16
# dmidecode 2.11
SMBIOS 2.4 present.
Handle 0x000A, DMI type 16, 15 bytes
Physical Memory Array
 Location: System Board Or Motherboard
 Use: System Memory
 Error Correction Type: None
 Maximum Capacity: 4 GB
 Error Information Handle: No Error
 Number Of Devices: 2
I do have 4GB installed:
~$ sudo dmidecode --type 19
# dmidecode 2.11
SMBIOS 2.4 present.
Handle 0x000D, DMI type 19, 15 bytes
Memory Array Mapped Address
 Starting Address: 0x00000000000
 Ending Address: 0x000FFFFFFFF
 Range Size: 4 GB
 Physical Array Handle: 0x000A
 Partition Width: 2
However, there is only ~3.3GB available:
~$ cat /proc/meminfo | grep "MemTotal"
MemTotal:        3460508 kB
Free shows the same:
~$ free -m
             total       used       free     shared    buffers     cached
Mem:          3379       2673        705          0        346       1109
-/+ buffers/cache:       1217       2161
Swap:         4881          0       4881
DMSG log has more detailed info:
~$ cat /var/log/dmesg | grep "Memory"
[    0.000000] Memory: 3439500K/3530168K available (7639K kernel code, 1140K rwdata, 3512K rodata, 1360K init, 1448K bss, 90668K reserved)
[   15.528520] [drm] Memory usable by graphics device = 256M
There is something else interesting in /var/log/dmesg (opened it with gedit)
[    0.000000] x86 PAT enabled: cpu 0, old 0x7040600070406, new 0x7010600070106
[    0.000000] original variable MTRRs
[    0.000000] reg 0, base: 0GB, range: 2GB, type WB
[    0.000000] reg 1, base: 2GB, range: 1GB, type WB
[    0.000000] reg 2, base: 3GB, range: 256MB, type WB
[    0.000000] reg 3, base: 3328MB, range: 128MB, type WB
[    0.000000] reg 4, base: 64888MB, range: 8MB, type UC
[    0.000000] reg 5, base: 4175488KB, range: 128KB, type UC
[    0.000000] total RAM covered: 3456M
[    0.000000] Found optimal setting for mtrr clean up
[    0.000000]  gran_size: 64K  chunk_size: 1G  num_reg: 3   lose cover RAM: 0G
[    0.000000] New variable MTRRs
[    0.000000] reg 0, base: 0GB, range: 4GB, type WB
[    0.000000] reg 1, base: 3456MB, range: 128MB, type UC
[    0.000000] reg 2, base: 3584MB, range: 512MB, type UC
The same information can be found here:
~$ cat /proc/mtrr
reg00: base=0x000000000 (    0MB), size= 4096MB, count=1: write-back
reg01: base=0x0d8000000 ( 3456MB), size=  128MB, count=1: uncachable
reg02: base=0x0e0000000 ( 3584MB), size=  512MB, count=1: uncachable
And then, 'smem' shows that there is ~700K reserved for the firmware/hardware... but WHY? (the "Used" amount sums up to 4194304 below)
~$ smem -R 4G -w
Area                           Used      Cache   Noncache
firmware/hardware            733796          0     733796
kernel image                      0          0          0
kernel dynamic memory       1827468    1718276     109192
userspace memory            1180160     207332     972828
free memory                  452880     452880          0
In comparison, when 3GB memory is in the machine, the numbers are like this:
~$ smem -R 3G -w
Area                           Used      Cache   Noncache
firmware/hardware             72292          0      72292
kernel image                      0          0          0
kernel dynamic memory       2324328    2228148      96180
userspace memory             648196     164924     483272
free memory                  100912     100912          0
~$ free -m
total used free shared buffers cached
Mem: 3001 2919 81 0 26 2164
-/+ buffers/cache: 727 2273
Swap: 4881 0 4881
[    0.000000] x86 PAT enabled: cpu 0, old 0x7040600070406, new 0x7010600070106
[    0.000000] original variable MTRRs
[    0.000000] reg 0, base: 0GB, range: 2GB, type WB
[    0.000000] reg 1, base: 2GB, range: 1GB, type WB
[    0.000000] reg 2, base: 64504MB, range: 8MB, type UC
[    0.000000] reg 3, base: 4175488KB, range: 128KB, type UC
[    0.000000] total RAM covered: 3072M
[    0.000000] Found optimal setting for mtrr clean up
[    0.000000]  gran_size: 64K  chunk_size: 64K  num_reg: 2   lose cover RAM: 0G
[    0.000000] New variable MTRRs
[    0.000000] reg 0, base: 0GB, range: 2GB, type WB
[    0.000000] reg 1, base: 2GB, range: 1GB, type WB
I also tried running Ubuntu from an USB pendrive, but it shows the same amount of memory. And I tried running Windows 7, and this also shows only 3,3GB.
According to this article (http://duartes.org/gustavo/blog/post/getting-physical-with-memory/), "some of the physical memory range in an Intel computer is mapped to devices like hard drives and network cards instead of actual RAM memory. This allows drivers to communicate with their devices by writing to and reading from memory. The kernel marks these memory regions as uncacheable in the page tables." Then in the article about the Memory Map (http://duartes.org/gustavo/blog/post/motherboard-chipsets-memory-map/) it is said that "this mapping of memory addresses away from RAM modules causes the classic hole in PC memory between 640KB and 1MB. A bigger hole arises when memory addresses are reserved for video cards and PCI devices." "The diagram below shows a typical memory map for the first 4 gigs of physical memory addresses in an Intel PC:"
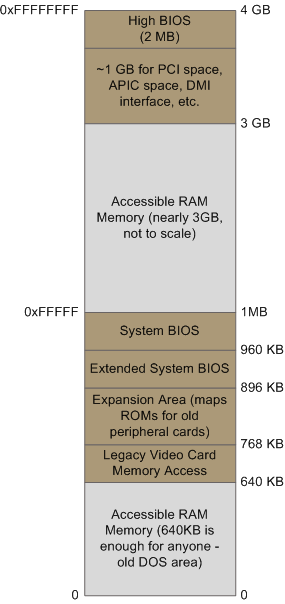
My conclusion is that there is no way to access all the 4GB of memory as RAM.
2016. január 14.
Notes on mounting and unmounting an Android Phone
If you do not have USB Mass Storage option any more on your Android phone to connect it to Ubuntu, but have Media Device (MTP) and Camera (PTP) instead, you have the following options:
A) You connect the phone with PTP, which works out of the box, but you'll only reach the camera related files from your device.
B) You try to hack around making MTP work to be able to reach all your files.
I went along with the latter case, and have not finished the process just yet, so I just list the pages that came along:
A) You connect the phone with PTP, which works out of the box, but you'll only reach the camera related files from your device.
B) You try to hack around making MTP work to be able to reach all your files.
I went along with the latter case, and have not finished the process just yet, so I just list the pages that came along:
- http://bernaerts.dyndns.org/linux/74-ubuntu/268-ubuntu-automount-any-mtp-device
- http://www.mysolutions.it/mounting-your-mtp-androids-sd-card-on-ubuntu/
- http://askubuntu.com/questions/87667/getting-mtp-enabled-devices-to-work-with-ubuntu
- http://ubuntuforums.org/showthread.php?t=2226702
- https://www.reddit.com/r/GalaxyNexus/comments/15uguz/automatic_mtp_mounting_in_ubuntu_guide/
2016. január 3.
Good-bye Ubuntu Phone
Today is the day when I gave up on the Ubuntu Phone. I sticked with it from May until the end of the year, updated it whenever there was a new update, but there was no significant improvement.
The main reason I quit for now is the lack of push notifications. I use my phone for communication, like probably most phone users. By sticking with the Ubuntu phone was like not having a smart phone at all. Only Gmail notifications worked, but I usually do the messaging on Facebook.
Another interestig problem was with the mobile internet connection.
I use a very limited connection for most of the time, because it is very cheap, and on an android phone I was able to stream a low bandwith internet radio with it, which is pretty much enough for me for the price. However this did not work on the Ubuntu Phone. When using this limited connection even the Gmail WebApp did not come through. (However gmail loaded through the browser, very-very slowly).
Lucky me, there is a way to convert the phone to Android, and this way at least the hardware is not wasted.
This is the tutorial: http://a25.co/ubuntu-phone-how-to-install-android/#fnref:1
The main reason I quit for now is the lack of push notifications. I use my phone for communication, like probably most phone users. By sticking with the Ubuntu phone was like not having a smart phone at all. Only Gmail notifications worked, but I usually do the messaging on Facebook.
Another interestig problem was with the mobile internet connection.
I use a very limited connection for most of the time, because it is very cheap, and on an android phone I was able to stream a low bandwith internet radio with it, which is pretty much enough for me for the price. However this did not work on the Ubuntu Phone. When using this limited connection even the Gmail WebApp did not come through. (However gmail loaded through the browser, very-very slowly).
Lucky me, there is a way to convert the phone to Android, and this way at least the hardware is not wasted.
This is the tutorial: http://a25.co/ubuntu-phone-how-to-install-android/#fnref:1
2015. október 2.
2015. október 1.
Plex Plugin Installer
So, since I found plex plugin manual installation painfully boring, I wrote a nautilus script to do the job for me.
Instead of copy-pasting, you can also download this script form github.
I wasted a couple hours finding out that if I use "double quotes" instead of 'single quotes' when assigning the plugin folder path to the PLUGIN_FOLDER variable, then 1.) the path will break on spaces and won't work; 2.) if I surround the call with '"'-s (a double quote between two single quotes) or just another "-s the program will fail not finding the files/directories. This was the tricky part because if instead of running I echoed the lines, they looked perfectly okay, and if I copy-pasted them to the command line they would even run properly... only not within a script.
Instead of copy-pasting, you can also download this script form github.
I wasted a couple hours finding out that if I use "double quotes" instead of 'single quotes' when assigning the plugin folder path to the PLUGIN_FOLDER variable, then 1.) the path will break on spaces and won't work; 2.) if I surround the call with '"'-s (a double quote between two single quotes) or just another "-s the program will fail not finding the files/directories. This was the tricky part because if instead of running I echoed the lines, they looked perfectly okay, and if I copy-pasted them to the command line they would even run properly... only not within a script.
#!/bin/bash
# nautilus script
# install PLEX plugin on Ubuntu 12.04.

# run this script by right clicking on the directory you want to install
install_plugin () {
 # standard feature: install by copying folder
 # future enhancement: install from ZIP file

 PARAMETERS=( "$@" )               ## array containing all params passed to the script

 PLUGIN_FOLDER='/var/lib/plexmediaserver/Library/Application Support/Plex Media Server/Plug-ins/'

 # read folder paths into TO_BE_INSTALLED
 IFS=$'\n' read -d '' -r -a TO_BE_INSTALLED < <(printf '%s\n' $PARAMETERS); unset $IFS

 need_to_restart_server=false

 for package in "${TO_BE_INSTALLED[@]}"; do
  package_name="${package##*/}" # Strip longest match of substring (*/) from front of string

 # sanity check: is the path correct? it should be a directory and end with ".bundle".
  if  [[ -d "$package" ]]; then # if selected path IS a directory
   if [[ "${package_name##*.}" == "bundle" ]]; then
    installed_package=$PLUGIN_FOLDER$package_name
   # check if plugin already exists
    if [[ -d "$installed_package" ]]; then
     # if yes, ask to delete it
     echo -n "A package with the same name is already installed. Would you like to overwrite it? (yes/no): "; read overwrite
     if [[ $overwrite == [Yy][Ee][Ss] || $overwrite == [Yy] ]]; then
      sudo rm -R "$installed_package"
     else
      echo "You chose not to overwrite $package_name so it will not be processed."
      continue
     fi
    fi
   # install plugin
    #copy the downloaded plugin to the plex plug-in directory
    sudo cp -R "$package" "$PLUGIN_FOLDER"

    #change the permissions to be like the existing plug-ins
    #(this is not needed in 14.04 anymore)
    sudo chmod ugoa+rx "$installed_package"

    #change the owner of the files to be like the existing plug-ins
    sudo chown -R plex:plex "$installed_package"

    need_to_restart_server=true

   else # if not "bundle"
    echo "Package name should end with '.bundle'. $package_name will not be processed."
    continue # process next package instead
   fi

  else # if not directory
   echo "Package should be a directory. $package_name will not be processed."
   continue # process next package instead
  fi

 done
# when finished with all packages, restart plex server.
if [[ $need_to_restart_server = true ]]; then
 sudo service plexmediaserver stop
 sleep 5
 sudo service plexmediaserver start

 echo "Installation complete. Your new plug-in should show up now in PLEX."
fi
}

export -f install_plugin

gnome-terminal --execute bash -c 'install_plugin "$NAUTILUS_SCRIPT_SELECTED_FILE_PATHS"; bash'
Feliratkozás:
Bejegyzések (Atom)