A következő címkéjű bejegyzések mutatása: precise. Összes bejegyzés megjelenítése

2016. január 19.

Out of 4GB RAM only 3.3GB is usable

Yesterday I bought a 2GB RAM to upgrade my HPQ TC4400 to the maximum allowed memory: 4GB. Before that I had 2+1GB installed, showing up as 2.9GB.

This 2+2GB RAM however shows up only as 3.3GB. Wow. Only 0.4GB increase. So I started to look around for the WHY?!?

Probably useful links:
  • There is actually a post about TC4400 here: http://forum.notebookreview.com/threads/tc4400-only-recognizes-3447mb-in-windows.225619/ It concludes that it was Windows' fault, and it needed an upgrade.
  • More useful info for linux:  http://superuser.com/questions/453201/only-3-2gb-of-4gb-ram-detected-on-64-bit-debian
  • Here they suggest to reinstall the 64-bit system: http://askubuntu.com/questions/32272/why-does-ubuntu-only-show-3gb-of-ram 


Another important note is that the BIOS is already the latest (Version: 68YHV Ver. F.0C; Release Date: 07/09/2008); It does not have an option for Memory Hole Remapping; The processor is Intel Pentium M Core2 CPU T5600 @ 1.83GHz and it does have a PAE (Physical address extension) flag (according to dmidecode).

I definitely have a 64-bit operating system, so the limitation cannot be due to a 32-bit OS.
~$ uname -a
Linux 3.13.0-74-generic #118~precise1-Ubuntu SMP Fri Dec 18 10:38:55 UTC 2015 x86_64 x86_64 x86_64 GNU/Linux

The maximum capacity is 4GB:
~$ sudo dmidecode --type 16
# dmidecode 2.11
SMBIOS 2.4 present.
Handle 0x000A, DMI type 16, 15 bytes
Physical Memory Array
 Location: System Board Or Motherboard
 Use: System Memory
 Error Correction Type: None
 Maximum Capacity: 4 GB
 Error Information Handle: No Error
 Number Of Devices: 2

I do have 4GB installed:
~$ sudo dmidecode --type 19
# dmidecode 2.11
SMBIOS 2.4 present.
Handle 0x000D, DMI type 19, 15 bytes
Memory Array Mapped Address
 Starting Address: 0x00000000000
 Ending Address: 0x000FFFFFFFF
 Range Size: 4 GB
 Physical Array Handle: 0x000A
 Partition Width: 2

However, there is only ~3.3GB available:
~$ cat /proc/meminfo | grep "MemTotal"
MemTotal:        3460508 kB

Free shows the same:
~$ free -m
             total       used       free     shared    buffers     cached
Mem:          3379       2673        705          0        346       1109
-/+ buffers/cache:       1217       2161
Swap:         4881          0       4881

DMSG log has more detailed info:
~$ cat /var/log/dmesg | grep "Memory"
[    0.000000] Memory: 3439500K/3530168K available (7639K kernel code, 1140K rwdata, 3512K rodata, 1360K init, 1448K bss, 90668K reserved)
[   15.528520] [drm] Memory usable by graphics device = 256M

There is something else interesting in /var/log/dmesg (opened it with gedit)
[    0.000000] x86 PAT enabled: cpu 0, old 0x7040600070406, new 0x7010600070106
[    0.000000] original variable MTRRs
[    0.000000] reg 0, base: 0GB, range: 2GB, type WB
[    0.000000] reg 1, base: 2GB, range: 1GB, type WB
[    0.000000] reg 2, base: 3GB, range: 256MB, type WB
[    0.000000] reg 3, base: 3328MB, range: 128MB, type WB
[    0.000000] reg 4, base: 64888MB, range: 8MB, type UC
[    0.000000] reg 5, base: 4175488KB, range: 128KB, type UC
[    0.000000] total RAM covered: 3456M
[    0.000000] Found optimal setting for mtrr clean up
[    0.000000]  gran_size: 64K  chunk_size: 1G  num_reg: 3   lose cover RAM: 0G
[    0.000000] New variable MTRRs
[    0.000000] reg 0, base: 0GB, range: 4GB, type WB
[    0.000000] reg 1, base: 3456MB, range: 128MB, type UC
[    0.000000] reg 2, base: 3584MB, range: 512MB, type UC

The same information can be found here:
~$ cat /proc/mtrr 
reg00: base=0x000000000 (    0MB), size= 4096MB, count=1: write-back
reg01: base=0x0d8000000 ( 3456MB), size=  128MB, count=1: uncachable
reg02: base=0x0e0000000 ( 3584MB), size=  512MB, count=1: uncachable

And then, 'smem' shows that there is ~700K reserved for the firmware/hardware... but WHY? (the "Used" amount sums up to 4194304 below)
~$ smem -R 4G -w
Area                           Used      Cache   Noncache 
firmware/hardware            733796          0     733796 
kernel image                      0          0          0 
kernel dynamic memory       1827468    1718276     109192 
userspace memory            1180160     207332     972828 
free memory                  452880     452880          0 

In comparison, when 3GB memory is in the machine, the numbers are like this:
~$ smem -R 3G -w
Area                           Used      Cache   Noncache 
firmware/hardware             72292          0      72292 
kernel image                      0          0          0 
kernel dynamic memory       2324328    2228148      96180 
userspace memory             648196     164924     483272 
free memory                  100912     100912          0

~$ free -m
             total       used       free     shared    buffers     cached
Mem:          3001       2919         81          0         26       2164
-/+ buffers/cache:        727       2273
Swap:         4881          0       4881

[    0.000000] x86 PAT enabled: cpu 0, old 0x7040600070406, new 0x7010600070106
[    0.000000] original variable MTRRs
[    0.000000] reg 0, base: 0GB, range: 2GB, type WB
[    0.000000] reg 1, base: 2GB, range: 1GB, type WB
[    0.000000] reg 2, base: 64504MB, range: 8MB, type UC
[    0.000000] reg 3, base: 4175488KB, range: 128KB, type UC
[    0.000000] total RAM covered: 3072M
[    0.000000] Found optimal setting for mtrr clean up
[    0.000000]  gran_size: 64K  chunk_size: 64K  num_reg: 2   lose cover RAM: 0G
[    0.000000] New variable MTRRs
[    0.000000] reg 0, base: 0GB, range: 2GB, type WB
[    0.000000] reg 1, base: 2GB, range: 1GB, type WB

I also tried running Ubuntu from an USB pendrive, but it shows the same amount of memory. And I tried running Windows 7, and this also shows only 3,3GB.

According to this article (http://duartes.org/gustavo/blog/post/getting-physical-with-memory/), "some of the physical memory range in an Intel computer is mapped to devices like hard drives and network cards instead of actual RAM memory. This allows drivers to communicate with their devices by writing to and reading from memory. The kernel marks these memory regions as uncacheable in the page tables." Then in the article about the Memory Map (http://duartes.org/gustavo/blog/post/motherboard-chipsets-memory-map/) it is said that "this mapping of memory addresses away from RAM modules causes the classic hole in PC memory between 640KB and 1MB. A bigger hole arises when memory addresses are reserved for video cards and PCI devices." "The diagram below shows a typical memory map for the first 4 gigs of physical memory addresses in an Intel PC:"
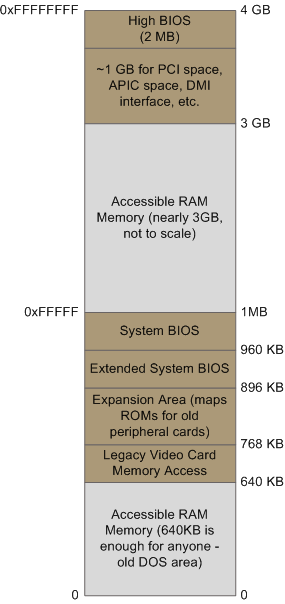
Then it is said that "the CPU mode determines how much physical memory can be accessed. For example, if the CPU is running in 32-bit mode, then it is only capable of physically addressing 4 GB (well, there is an exception called physical address extension, but ignore it for now). Since the top 1 GB or so of physical addresses are mapped to motherboard devices the CPU can effectively use only ~3 GB of RAM. [...] On the other hand, a CPU running in 64-bit mode can physically access 64GB (few chipsets support that much RAM though). In 64-bit mode it is possible to use physical addresses above the total RAM in the system to access the RAM regions that correspond to physical addresses stolen by motherboard devices. This is called reclaiming memory and it’s done with help from the chipset."

My conclusion is that there is no way to access all the 4GB of memory as RAM.

2016. január 14.

Notes on mounting and unmounting an Android Phone

If you do not have USB Mass Storage option any more on your Android phone to connect it to Ubuntu, but have Media Device (MTP) and Camera (PTP) instead, you have the following options:

A) You connect the phone with PTP, which works out of the box, but you'll only reach the camera related files from your device.

B) You try to hack around making MTP work to be able to reach all your files.

I went along with the latter case, and have not finished the process just yet, so I just list the pages that came along:
  • http://bernaerts.dyndns.org/linux/74-ubuntu/268-ubuntu-automount-any-mtp-device
  • http://www.mysolutions.it/mounting-your-mtp-androids-sd-card-on-ubuntu/
  • http://askubuntu.com/questions/87667/getting-mtp-enabled-devices-to-work-with-ubuntu
  • http://ubuntuforums.org/showthread.php?t=2226702
  • https://www.reddit.com/r/GalaxyNexus/comments/15uguz/automatic_mtp_mounting_in_ubuntu_guide/

2015. október 1.

Plex Plugin Installer

So, since I found plex plugin manual installation painfully boring, I wrote a nautilus script to do the job for me.
Instead of copy-pasting, you can also download this script form github.

I wasted a couple hours finding out that  if I use "double quotes" instead of 'single quotes' when assigning the plugin folder path to the PLUGIN_FOLDER variable, then 1.) the path will break on spaces and won't work; 2.) if I surround the call with '"'-s (a double quote between two single quotes) or just another "-s the program will fail not finding the files/directories. This was the tricky part because if instead of running I echoed the lines, they looked perfectly okay, and if I copy-pasted them to the command line they would even run properly... only not within a script.

#!/bin/bash
# nautilus script
# install PLEX plugin on Ubuntu 12.04.

# run this script by right clicking on the directory you want to install
install_plugin () {
 # standard feature: install by copying folder
 # future enhancement: install from ZIP file

 PARAMETERS=( "$@" )               ## array containing all params passed to the script

 PLUGIN_FOLDER='/var/lib/plexmediaserver/Library/Application Support/Plex Media Server/Plug-ins/'

 # read folder paths into TO_BE_INSTALLED
 IFS=$'\n' read -d '' -r -a TO_BE_INSTALLED < <(printf '%s\n' $PARAMETERS); unset $IFS

 need_to_restart_server=false

 for package in "${TO_BE_INSTALLED[@]}"; do
  package_name="${package##*/}" # Strip longest match of substring (*/) from front of string

 # sanity check: is the path correct? it should be a directory and end with ".bundle".
  if  [[ -d "$package" ]]; then # if selected path IS a directory
   if [[ "${package_name##*.}" == "bundle" ]]; then
    installed_package=$PLUGIN_FOLDER$package_name
   # check if plugin already exists
    if [[ -d "$installed_package" ]]; then 
     # if yes, ask to delete it 
     echo -n "A package with the same name is already installed. Would you like to overwrite it? (yes/no): "; read overwrite 
     if [[ $overwrite == [Yy][Ee][Ss] || $overwrite == [Yy] ]]; then 
      sudo rm -R "$installed_package"
     else
      echo "You chose not to overwrite $package_name so it will not be processed."
      continue
     fi
    fi
   # install plugin
    #copy the downloaded plugin to the plex plug-in directory
    sudo cp -R "$package" "$PLUGIN_FOLDER"

    #change the permissions to be like the existing plug-ins 
    #(this is not needed in 14.04 anymore)
    sudo chmod ugoa+rx "$installed_package"

    #change the owner of the files to be like the existing plug-ins
    sudo chown -R plex:plex "$installed_package"

    need_to_restart_server=true

   else # if not "bundle"
    echo "Package name should end with '.bundle'. $package_name will not be processed."
    continue # process next package instead
   fi

  else # if not directory
   echo "Package should be a directory. $package_name will not be processed."
   continue # process next package instead
  fi

 done
# when finished with all packages, restart plex server.
if [[ $need_to_restart_server = true ]]; then 
 sudo service plexmediaserver stop
 sleep 5
 sudo service plexmediaserver start
 
 echo "Installation complete. Your new plug-in should show up now in PLEX."
fi
}

export -f install_plugin

gnome-terminal --execute bash -c 'install_plugin "$NAUTILUS_SCRIPT_SELECTED_FILE_PATHS"; bash'

2015. június 5.

How to install Sigil ePub editor on Ubuntu 12.04

Sigil, the best ePub e-book creation and editor tool I know, has no longer an official Linux version.
However, it is still possible to get a native copy running on your Ubuntu.
Please refer to this askubuntu post if the below method does not work for you (because it is probably already outdated).

On Ubuntu 12.04:
You'll need to add two repositories, one for Sigil and one for a dependency, then update repos, and install:
sudo add-apt-repository ppa:sunab/sigil-git
sudo add-apt-repository ppa:beineri/opt-qt521
sudo apt-get update
sudo apt-get install qt52base qt52webkit
sudo apt-get install sigil

2015. április 30.

color to grayscale PDF

The source file:
a PDF with page size US letter portrait
with text layer (different color and text background varying)
with color images as background (many images sum up to one background picture

The quest: convert the source PDF to:
a PDF with page size A4 portrait
with or without text layer (flatten or not - but keep text readable)
with grayscale and/or black and white (but recognizable) images as background

The purpose: print out the pdf on a regular black-and white printer:
keep it readable, and esthetically enjoyable
do not use more ink than necessary

***
The routes I tried:

1.) (from under the text layer) extract images, convert images, put images back.

Toolkit:

Extract images:
pdf2htmlEX --embed cfijo example.pdf

Convert images:
mogrify -type Grayscale -format ps *.png

...convert back to pdf with ps2pdf, join with pdfjoin or pdftk

Extract text layer:  
cpdf -draft example.pdf -o example_text.pdf

Put background images behind text layer:
pdftk  example_text.pdf multibackground example_images.pdf output modified.pdf


2.) flatten PDF to images, edit images.

Toolkit:

Burst pdf to single pages:
pdftk example.pdf burst

Convert to PostScript:
pdftops (and not pdf2ps)

Flatten ps to pnm and edit image
mogrify -format pnm -density 200x200 -type grayscale *.ps

...convert back to pdf with ps2pdf, join with pdfjoin or pdftk


***
In the end I chose the second route, because I had some trouble with the fonts in the pdf, which were not exported properly, and left a black text box in the images (making the text unreadable after backgrounding back to pdf)

Also the first route would involve a lot of learning of the PDF structure, the layer manipulation, and so on.

2015. április 26.

How to turn off ubuntu overlay scrollbar

https://www.liberiangeek.net/2012/03/disable-ubuntu-overlay-scrollbars-in-ubuntu-12-04-precise-pangolin/

~$ gsettings set org.gnome.desktop.interface ubuntu-overlay-scrollbars false

This can be set by hand in dconf editor:

org > gnome > desktop > interface > ubuntu -overlay-scrollbars [remove checkmark]

2015. február 27.

PDF to HTML for eBook creation

My general goal is to process PDF files through a HTML/XML state before making eBook (mobi/epub) from them.
So the goal is, to somehow generate a clean HTML file out of a PDF.
Some of my general needs are:
  • keep paragraphs together (not mixing up <br /> with <p></p>)
  • get images and text together
  • keep character formatting
  • handle multiple columns (convert to single column)
  • skip page numbers
First of all, here's what I found important from the Google search results:

Thomas Levine's Parsing PDF files walk-through
Tools to use:
  • Basic file analysis tools (ls or another language’s equivalent)
  • PDF metadata tools (pdfinfo or an equivalent)
  • pdftotext
  • pdftohtml -xml
  • Inkscape via pdf2svg
  • PDFMiner
My own experiments:
With this PDF file, and another one that I made for this purpose.


PDFtoHTML
$ pdftohtml example.pdf
  • incorrectly displayed character encoding
    • <meta http-equiv="CONTENT-TYPE" content="text/html; charset=utf-8"> has to be entered in the HTML HEAD for proper character encoding 
    • could put a -enc UTF-8 (Case Sensitive!) as an option if needed, but the header meta still has to be entered manually. 
    • the meta gets entered in the document if the -noframes option is used.
  • no paragraphs, only breaks
  • a navigation html file was generated with two frames: one for a page index html, and one for the actual text.
    • this can be avoided using the -noframes option
    • the -s option to generate single output (however this will only concatenate the whole html files, and links are not corrected)
  • pages are separated with horizontal rulers
  • images are processed all right
 $ pdftohtml -c example.pdf
  • formatting is mostly strictly preserved
    • styles by css
    • absolute positions of paragraphs
      • some paragraphs are kept together, some are not recognized properly
    • left text alignment is the only one that is kept, everything else is shown with absolute left position.
    • bold and italics is preserved, but underline shows wrong
    • columns are preserved okay
    • font face changes do not show.
  • images are embedded in page background
  • every page is a separate html file
$ pdftohtml -xml example.pdf
  • stores formatting info about absolute positions, font size and line height
  • no info about paragraphs, images
Alltogether experinece with PDFtoHTML: it's almost good for nothing, when it is not processed properly afterwards.

Postprocessing a file generated with the pdftohtml -enc UTF-8 -noframes -p -q example.pdf command:
Sturcture:
  • style element and some meta element in the html head are unnecessary.
  • <a name=[pagenunber]></a> marks the beginning of every page
  • <br/> in the middle of a line marks line break
  • <br/> at the end of the line marks paragraph break
  • <hr/> marks the end of every page
  • the last line before the end of page is probably a page number
PDFMiner
Download and Install PDFMiner.
Review the command line tools and their capacity.

$ pdf2txt.py -o example.html  example.pdf
or
$ pdf2txt.py -Y normal -o example.html  example.pdf 
  • no paragraphs, only breaks
    (paragraphs are not collected -- no easy way to restore them, unlike in pdftohtml)
  • formatting is not css but html span tags
    • Html Tidy can collect the formatting to the front of the html file as css, making it easier to review and modify:
      tidy -utf8 -c -o example_tidy.html  example.html
  • bold and italics are kept as font family style in span tag, underline is taken as an image (?)
  • images not processed
  • display is messy, text displayed on top of each other
  • code is quite all right.
$ pdf2txt.py -o example.xml  example.pdf
or
$ pdf2txt.py -Y exact -o example.html  example.pdf 
  • stores exact position of every single character
  • holds space for images
$ pdf2txt.py -t tag -o example.txt  example.pdf
  • stores pdf page data, with unformatted text content
$ pdf2txt.py -Y loose -o example.html  example.pdf
  • does not keep the line breaks, only the span style is present to indicate text changes. paragraphs not recognized properly
  • messy code
Alltogether experinece with PDFMiner: this is not what I'm looking for. It either store too much or too little information for my purposes, so in my case it's actually good for nothing, when it is not processed properly afterwards.


pdf2htmlEX
$ pdf2htmlEX example.pdf
  • omg wow amazing pretty output view!
    • everything looks exactly like the pdf file
  • (in exchange for an) extremely messy code :)
    • one page is one line, identified by a (div) id.
    • formatting is kept in classes (div, span, img, ...) by CSS:
      • @font-face {}
      • @media {}
      • .ff: font-family
      • (t) m: transformation matrix
      • v: vertical-align
      • ls: letter-spacing
      • sc: text-shadow
      • ws: word-spacing
      • _: display and width or margin-left
      • fc: color
      • fs: font-size
      • y: bottom
      • h: height
      • w: width
      • x: left
  • all file embedding can be turned off with --embed cfijo (will generate separate output files)
Alltogether useless for my purposes.However, the best if your purpose is to display a pdf file as a html page on the web.

PdfMasher (GUI)
Does not keep formatting or images, but is specialized to keep proper order of the text.
  • as said, does not keep font formatting or image placeholders
  • with a little manual adjustment:
    • can be set to ignore page numbers (amazing!)
    • can be set to collect and link footnotes to be endnotes (amazing!)
  • html code is quite clear
  • paragraphs are well kept if it was possible
Alltogether so far this is the best tool to prepare a simple text pdf for eBook creation.
Usage:
There are five type of elements that can be set in Edit mode:
  • Normal: will be default text
  • Title: will be Header tag H1 for once pressed, H2 for twice pressed, etc.
    • best to be filtered with sorting by Font Size
  • Footnote: will search for the reference and link it as endnote
    • best to be filtered with sorting by Font Size (or X or Y, respectively)
  • Ignore: will be ignored
    • Page numbers, footers and headers are best to be filtered with sorting by Y (or X, respectively)
  • To Fix:puts a FIXME sign in front of the paragraph. In HTML this becomes an italics formatted text.
These types can be set on the Table or on the Page tab.
Build options are:
  • Generate Markdown: generates a plain text file in the pdf directory with marks specifying the Title and To Fix parts, Ignored elements already ignored, and Footnotes already linked.
  •  Edit Markdown: opens the markdown text file
  • Reveal Markdown: opens the directory in the default file browser containing the markdown
  • View HTML: generates the html file out of the markdown file, and opens it in the default web browser
Markdown signs:
  • # for H1, ## for H2, etc.
  • *FIXME* for italics
  • *** for horizontal ruler  
  • numbers for lists (quite annoying)
  • more on markdown usage
  • I accidentally found an eBook creation software that works from text like this markdown text, so I'll just leave a link here for notice.
Formatting of the text can be fixed manually in the markdown form or in the html form.
When saving as MOBI or EPUB there will be Table of Contents and navigation generated from the headings. The book Start will be set to the first heading.

Summary:
  • To export all images from your file for further usage,
    use pdf2htmlEX --embed cfijo example.pdf.
    • can be opened in LibreOffice
  • To get a very simple html with proper paragraphs, endnotes, and headings, but without font formatting,
    use PDFMasher (GUI).
  • To get a fair html code with most of the images and font formatting but messed up paragraphing,
    use pdftohtml -enc UTF-8 -noframes -p -q example.pdf
    • cannot be opened in LibreOffice
That's it for so far.
Probably the best way would be to learn SED and create a html cleaning script for myself, but that's likely distant future.

2015. február 25.

PDF smart rename and split based on content


I was planning to do these scripts for some time to ease my work with pdf files.

The original idea was to grep some text from the pdf file and do a file manipulation based on the text.

This StackExchange post suggests the following methods to find a piece of text in a pdf:
  • pdftotext + grep
  • pdfgrep
  • strings + grep
  • pdftohtml + grep
I used pdftotext in the following examples.

I also needed to learn some more Bash scripting:
1st Quest
I have a monthly employee data sheet (payroll), which I get in one big multipage pdf file, having a single page for each employee. The content for each page is: 1st line: title, 2nd line: month, 3rd line: employee name.
I wanted to burst this pdf file into single pages and rename it to title month and employee name.
My solution is:
#!/bin/bash
# NAUTILUS SCRIPT
# automatically splits pdf file to single pages while renaming the output files using the first three of lines of the pdf

# read files
IFS=$'\n' read -d '' -r -a filelist < <(printf '%s\n' "$NAUTILUS_SCRIPT_SELECTED_FILE_PATHS"); unset $IFS

pagecount=1
datestamp=1

# burst and rename pages to separate files
for file in "${filelist[@]}"; do
 pagecount=`pdfinfo $file | grep "Pages" | awk '{ print $2 }'`
 for (( pageindex=1; pageindex<=$pagecount; pageindex+=1 )); do
  newname=`pdftotext -f $pageindex -l $pageindex $file - | head -n 3 | tr '\n' ' ' | cut -f1 -d"("`
  let "datestamp =`date +%s%N`" # to avoid overwriting with same new name
  pdftk $file cat $pageindex output "$newname"$datestamp.pdf
 done
done

2nd Quest
I have files I would like to rename based on the content of the file. Each file is some kind of employee data file, and has the employee name in the content, but not necessary in the file name.
I wanted to rename the file based on the employee name and the page title (first line of the file).
My solution is:
#!/bin/bash
# NAUTILUS SCRIPT
# automatically renames pdf file based on content maching a list of names

# read files
IFS=$'\n' read -d '' -r -a filelist < <(printf '%s\n' "$NAUTILUS_SCRIPT_SELECTED_FILE_PATHS"); unset $IFS

names=( "Aaa Aaa" "Bbb Bbb" "Ccc Ccc") # names to match in the files

# process files
for file in "${filelist[@]}"; do
 # find name from names in the file
 foundname=''
 for name in "${names[@]}"; do
  testname=`pdftotext "$file" - | grep $name`
  if [[ $testname != "" ]]; then
   foundname=$name
   break
  fi
 done

 # rename file based on found name
 title=`pdftotext -f 1 -l 1 "$file" - | head -n 1`
 let "datestamp =`date +%s%N`"
 mv "$file" "${file%/*}/$foundname $title $datestamp.pdf"
done

3rd Quest
I have a yearly employee data sheet (personal tax data), which I get in one big multipage pdf file, having a multiple pages for each employee. This year it is three pages per employee, but the tax ID number is the only common point in the three pages (it it a 10 digit long number beginning with number 8). The first line of each page is a header, and it is different for each page for a single employee.
I wanted to split the pdf to employees and rename it with the header of the pages.
My solution is:
#!/bin/bash
# NAUTILUS SCRIPT
# automatically splits pdf file to multiple pages based on search criteria while renaming the output files using the search criteria and some of the pdf text.

# read files
IFS=$'\n' read -d '' -r -a filelist < <(printf '%s\n' "$NAUTILUS_SCRIPT_SELECTED_FILE_PATHS"); unset $IFS

# process files
for file in "${filelist[@]}"; do
 pagecount=`pdfinfo $file | grep "Pages" | awk '{ print $2 }'`
 # MY SEARCH CRITERIA is a 10 digit long ID number that begins with number 8: 
 storedid=`pdftotext -f 1 -l 1 $file - | egrep '8?[0-9]{9}'`
 pattern=''
 pagetitle=''
 datestamp=''

 for (( pageindex=1; pageindex<=$pagecount; pageindex+=1 )); do

  header=`pdftotext -f $pageindex -l $pageindex $file - | head -n 1`
  pageid=`pdftotext -f $pageindex -l $pageindex $file - | egrep '8?[0-9]{9}'`
  let "datestamp =`date +%s%N`" # to avoid overwriting with same new name

  # match ID found on the page to the stored ID
  if [[ $pageid == $storedid ]]; then
   pattern+="$pageindex " # adds number as text to variable separated by spaces
   pagetitle+="$header+"

   if [[ $pageindex == $pagecount ]]; then #process last output of the file 
    pdftk $file cat $pattern output "$storedid $pagetitle $datestamp.pdf"
    storedid=0
    pattern=''
    pagetitle=''
   fi
  else 
   #process previous set of pages to output
   pdftk $file cat $pattern output "$storedid $pagetitle $datestamp.pdf"
   storedid=$pageid
   pattern="$pageindex "
   pagetitle="$header+"
  fi
 done
done

4th Quest
I wanted to have an alternate version of the 3rd Quest in case I have to split in equal sets of pages any other type of file, not having the tax ID as a common point in them.
So I wanted to split this multipage pdf based on a manually set block size, i.e. 3 pages / set.
My solution is:
#!/bin/bash
# NAUTILUS SCRIPT
# automatically splits pdf file to multiple pages based on given block size, and renames the files using the original filename plus datestamp

# read files
IFS=$'\n' read -d '' -r -a filelist < <(printf '%s\n' "$NAUTILUS_SCRIPT_SELECTED_FILE_PATHS"); unset $IFS

# process files
for file in "${filelist[@]}"; do

 # variables
 blocksize=3 # ADD BLOCK SIZE MANUALLY HERE
 blocks=()
 filename=${file%.pdf} # remove extension from filename

 # calculate page range blocks
 pagecount=`pdfinfo $file | grep "Pages" | awk '{ print $2 }'` 
 let setcount=$pagecount/$blocksize 
 for (( setindex=1; setindex<=$setcount; setindex+=1 )); do

  if [[ $setindex -lt $setcount ]]; then
   let lastpage=$setindex*$blocksize
   let firstpage=$lastpage-$blocksize+1

  elif [[ $setindex -eq $setcount ]]; then # handle last page
   let lastpage=$pagecount
   let firstpage=$setindex*$blocksize-$blocksize+1

  fi
  blocks+=("$firstpage-$lastpage")
 done

 # process ranges to output
 for block in "${blocks[@]}"; do
  let "datestamp =`date +%s%N`" # to avoid overwriting with same new name
  pdftk $file cat $block output "$filename $datestamp.pdf"
 done
done

That's it. Could be better, but is functioning all right.

2015. február 19.

Using NCX-generator on Wine

NCX-generator is a Windows Command Line Interface utility to prepare e-books for processing with Kindlegen.

ncx-generator can be used through Wine. It requires .NET Framework 4 to be installed.

ncx-generator have to be run through Wine's Console User Interface (wineconsole - installed with the wine package).

This is the help file:

ncxgen [options] filename

  -h, -?, --help             Display this help.
      --toc                  Generate the html Table of Contents.
      --ncx                  Generate the NCX Global Navigation.
      --opf                  Create the opf file package.
  -a, --all                  Create both html ToC, ncx and opf files.
  -q, --query=VALUE          The XPath query to find the ToC items. Use
                               multiple times to add levels in the ToC.
  -l, --level=VALUE          Number of levels to collapse to generate the NCX
                               file - used with -ncx or -all.
  -e                         Place the generated TOC at the end of the book
      --toc-title=VALUE      Name of the Table of Contents
      --author=VALUE         Author name.
      --title=VALUE          Book title.
  -v, --verbose              Turn on verbose output
  -i                         Convert <PRE class='image'> tages to PNG images
      --overwrite            Overwrite files without any prompt

Example:
         "ngen.exe -all -q "//h1" -q "//h2[@class='toc']" source.xhtml"
This expression will parse the xhtml file source.xhtml looking for the tag h1 an
d the tag h2 with an attribute class set to 'toc'. It will then create the html
 Table of Contents, the NCX Global Navigation file and the OPF file using the it
ems found.

The difference between the Ubuntu Terminal and the WineConsole is, that you cannot use the TAB to fill in the filenames for you, and you have to refer to directories in your actual directory with a ./directory_name/ instead of using simply directory_name/ as in the Ubuntu Terminal.

To run the Windows Command Line Interface run wineconsole cmd
To run do this without opening the Windows Command Line Interface, just run the command through WineConsole, as if you were using the Windows CLI. This way it is possible to use the TAB to fill in filenames, which is a pleasure. The Windows CLI will be opened by WineConsole to run the command, and be closed when the running ends. If the user is prompted for keyboard input, the Windows CLI will stay open and wait for the user input.
~$ wineconsole ncxGen.0.2.6.exe -a -q "//h1" --author="Book Author Name" --title="Book Title" --toc-title="TOC Title" ./Test_Book/Book.html

This way NCX-generator can be integrated into bash scripts :)

Running a command like the above (with -a option) having a Book.html and a Cover.jpg to begin with, will create the following files in the file directory:
Book.ncx
Booktoc.html
Book.opf
Bookout.html


NOTE: if you name the cover image Cover.jpg, and put it in the same directory as the book HTML, it will be automatically recognized and included properly in the OPF file, when you run ncxGen. By specifying the --author and --title options too, you will not have to edit the OPF manually at all before building your book with KindleGen.
However, some UTF-8 characters are not properly recognized in ncxGen, so if you use i.e. Hungarian characters like ő or ű in the title, toc-title or author, you'd better check the OPF and correct it.

2015. február 15.

Installing MobiPocket Creator on Ubuntu

First of all, install the latest version of wine.
Seconds, set it to have a 32-bit Wine Prefix :
remove the current Wine settings directory:
sudo rm -r ~/.wine
and then create 32 bit prefix with this command:
WINEARCH=win32 WINEPREFIX=~/.wine winecfg 
Now for Mobipocket Creator to run properly, run this in terminal and follow any instructions:
winetricks ie6 vcrun2005
Apparently creating new mobi books work, but it pops up an error every time you do something. Just ignore these errors and build the book anyway.

UPDATE:
do this to have a clear GUI for Mobipocket Creator:
winetricks ie8
This solves the pop-up errors and the incomplete user interface!


Install MobiPocket Creator:
Download from official page,
double click to install with Wine.

Usage

Installing the latest version of Wine

I installed Wine from the repository, but it did not work well with the program I installed on it, so I tried out what happens if I update Wine.

1. add the wine source to your repository:
sudo add-apt-repository ppa:ubuntu-wine/ppa
2. update repository list:
sudo apt-get update
3. install latest version of wine
sudo apt-get install wine

The program I wanted to run, and were fixed by this update:
  • Amazon Kindle Previewer

2015. január 25.

Nautilus Scripts for Tablet screen rotation

After some workaround in the past, I started using nautilus scripts to rotate my Tablet display together with the stylus and eraser.
(I moved this topic now to a separate post, because the original post is outdated)

#!/bin/sh
# for Lucid Lynx to rotate the display 180 degree
xrandr -o inverted
xsetwacom set 'Serial Wacom Tablet' Rotate HALF


#!/bin/sh
# for Lucid Lynx to rotate the display 90 degree to the left
xrandr -o left
xsetwacom set 'Serial Wacom Tablet' Rotate CCW


#!/bin/sh
# for Lucid Lynx to rotate the display back to normal
xrandr -o normal
xsetwacom set 'Serial Wacom Tablet' Rotate NONE


#!/bin/sh
# for Lucid Lynx to rotate the display 90 degree to the right (to take notes)
xrandr -o right
xsetwacom set 'Serial Wacom Tablet' Rotate CW

Nautilus scripting in bash: processing multiple files / handle space in filenames

Where do I put the scripts? 

Nautilus scripts folder is in your user home directory:
in Ubuntu 12.04 and before: .gnome2/nautilus-scripts/
from Ubuntu 14.04: .local/share/nautilus/scripts/

You'll have to make all script files executable in order to be able to run them.
chmod +x

What does a nautilus script do? 

All executable files in this folder will appear in the Scripts menu. Choosing a script from the menu will run that script.

When executed from a local folder, scripts will be passed the selected file names. When executed from a remote folder (e.g. a folder showing web or ftp content), scripts will be passed no parameters.

What nautilus script specific variables can I use?

In all cases, the following environment variables will be set by Nautilus, which the scripts may use:

  • NAUTILUS_SCRIPT_SELECTED_FILE_PATHS
    # newline-delimited paths for selected files (only if local)
  • NAUTILUS_SCRIPT_SELECTED_URIS
    # newline-delimited URIs for selected files
  • NAUTILUS_SCRIPT_CURRENT_URI
    # URI for current location
  • NAUTILUS_SCRIPT_WINDOW_GEOMETRY
    # position and size of current window
# from Ubuntu 14.04 Nautilus does not have split view (extra pane), so these variables (most likely) will not work:
  • NAUTILUS_SCRIPT_NEXT_PANE_SELECTED_FILE_PATHS
    # newline-delimited paths for selected files in the inactive pane of a split-view window (only if local)
  • NAUTILUS_SCRIPT_NEXT_PANE_SELECTED_URIS
    # newline-delimited URIs for selected files in the inactive pane of a split-view window
  • NAUTILUS_SCRIPT_NEXT_PANE_CURRENT_URI
    # URI for current location in the inactive pane of a split-view window
How do these variables work? 

To test what these variables do you might use this nautilus script:
#!/bin/bash
# test your nautilus variables
touch $HOME/nautilustesting.txt
echo "SELECTED_FILE_PATHS: " "$NAUTILUS_SCRIPT_SELECTED_FILE_PATHS" >> $HOME/nautilustesting.txt
echo "SELECTED_URIS: " "$NAUTILUS_SCRIPT_SELECTED_URIS"  >> $HOME/nautilustesting.txt
echo "CURRENT_URI: " "$NAUTILUS_SCRIPT_CURRENT_URI" >> $HOME/nautilustesting.txt
echo "WINDOW_GEOMETRY: " "$NAUTILUS_SCRIPT_WINDOW_GEOMETRY" >> $HOME/nautilustesting.txt
echo " " >> $HOME/nautilustesting.txt

How to use these variables?

The variables you get will look something like this (in case of selecting 4 files with spaces in the names):
SELECTED_FILE_PATHS:  /home/username/.gnome2/nautilus-scripts/Screen rotate/Set screen inverted
/home/username/.gnome2/nautilus-scripts/Screen rotate/Set screen left
/home/username/.gnome2/nautilus-scripts/Screen rotate/Set screen normal
/home/username/.gnome2/nautilus-scripts/Screen rotate/Set screen right (notes)
SELECTED_URIS:  file:///home/username/.gnome2/nautilus-scripts/Screen%20rotate/Set%20screen%20inverted
file:///home/username/.gnome2/nautilus-scripts/Screen%20rotate/Set%20screen%20left
file:///home/username/.gnome2/nautilus-scripts/Screen%20rotate/Set%20screen%20normal
file:///home/username/.gnome2/nautilus-scripts/Screen%20rotate/Set%20screen%20right%20(notes)
CURRENT_URI:  file:///home/username/.gnome2/nautilus-scripts
WINDOW_GEOMETRY:  1022x690+0+1024

How to read nautilus selected file paths with spaces into a bash array?

To have a use of them as input file path for example imagemagick, I'll have to deal with the spaces, because these command line programs usually take "file path" as input and do not take "file URI" as input, and file path may contain spaces.

The FAQ of the G-Scripts site suggests some ways to handle this:
  1. protect your variable with double quotes: instead of $1 use "$1"
  2. process the filenames with SED:
    files=`echo "$1" | sed 's/ /\\ /g'`
  3. process the filenames with AWK and SED:
    quoted=$(echo -e "$NAUTILUS_SCRIPT_SELECTED_FILE_PATHS" | awk 'BEGIN {FS = "\n" } { printf "\"%s\" ", $1 }' | sed -e s#\"\"##); eval "your-program $quoted"
Actually, for me NONE of the above worked.
I found my solution in a stackoverflow post. It uses the IFS value to deal with the filenames. I read somewhere that using the IFS is an inelegant way to deal with field separators, and one should use AWK FS variable instead.

My solution: 

This is to use with nautilus scripts:
IFS=$'\n' read -d '' -r -a filelist < <(printf '%s\n' "$NAUTILUS_SCRIPT_SELECTED_FILE_PATHS"); unset $IFS
This is to use with my image manipulation scripts (where the script file is located in the same folder as the to-b-manipulated files):
IFS=$'\n' read -d "" -r -a filelist < <(find -iname "*.jpg" | sort); unset $IFS
When you want to call the elements of the array, you'll have to put them in double quotes, like
for i in "${filelist[@]}" 
do echo "$i"
done
Google search keywords to find the solution:

  • escape space in bash script
  • awk fs line break
  • sed change space to newline
  • escape space in bash script with sed
  • internal field separator
  • bash read file names into array
  • bash read space file names into array
  • echo into array bash
  • while read output array bash


2015. január 19.

Some trouble I experience with Ubuntu 12.04 and Gnome Classic w/o effects


  • nautilus crash on removing external drives
  • window shadows are partially left behind after the window was moved or closed
  • after awaken from suspended mode, pressing the ctrl key caused a change in the display settings on a dual monitor setup. Each time the ctrl key was pressed the display setting changed between 1. extended displays 2. mirrored displays 3. one display turned off.
  • in Firefox, Google applications tend to freeze for like 20 seconds and don't register clicks

2015. január 18.

Gnome Classic tweaks on Ubuntu 12.04.5 Precise Pangolin compared to 14.04.1 Trusty Thar

In this post I'm going to configure Ubuntu 12.04.5. LTS to my taste. Since I configured a 14.04.1 LTS just a couple of weeks ago the exact same way, I will compare the how-to of these settings.

What do I need from Ubuntu?
- this post has the list of features I'm going to test against Precise Pangolin.

Desktop Environment Choices
- I chose Gnome Flashback Services again, but in 12.04 it is called Gnome Classic (with or without effects) and can be installed by installing the package gnome-session-fallback instead of gnome-session-flashback.
- Synaptic package manager is not installed by default on 12.04, just like on 14.04, so it has to be installed from terminal with the sudo apt-get install synaptic command (or probably from Ubuntu Software Center, which I prefer to not use)

All the following notes are based on using Gnome Classic without Effects.

Setting up everything

Gnome Classic is somewhat different from Gnome Session Flashback.
Some useful tips can be found in this ubuntu forum thread.

Otherwise, compared to Ubuntu 14.04:
  • HP Compaq TC4400 native features:
    • pen features: the same
    • screen rotation: the same
    • on-screen buttons: the same
  • Terminal: the same
  • Workspaces: the same
  • Panels: the same
  • Synaptic: the same
  • File manager: Nautilus still can do all I want, so I'll stick with it.
    • Scripts: the same
    • Open in Terminal: the same (install nautilus-open-terminal package to get right click option "Open Terminal") 
Tablet input usage in multi-screen environment compared to Ubuntu 10.04 Lucid Lynx:
  • xinput has a new version, and it enables to map the tablet input device to the tablet screen by using xinput --map-to-crtc device crtc
    • where device is the device ID of the stylus or the eraser taken from xinput --list
    • and the crtc is the name of the tablet monitor taken from xrandr
    Changing the Date and Time format in the indicator applet
    - on Precise there is no configuration editor pre-installed.
    - DConf Editor can be installed by installing dconf-tools - then it will be available as dconf-editor of from the Applications menu > System Tools > DConf Editor
    - after installing it, setting custom date and time format can be done as in Trusty, described in the post linked above.

    Indicator Applet
    - Gnome Classic installs indicator-applet-complete, but there are more then one indicator applet that can be downloaded with synaptic. The difference between them is this:
    • indicator-applet-complete is: messaging applications, power settings, bluetooth settings, network settings, sound settings, date and time settings, user accounts, session management
    • indicator-applet is: messaging applications, power settings, bluetooth settings, network settings, sound settings
    • indicator-applet-session is: user accounts, session management
    • indicator-applet-appmenu is: your active application's menu header
    Some modifications can be made to the features shown in the indicator applet with DConf editor - as described above. 

    Remove messaging envelope from indicator applet
    This AskUbuntu post holds the solution: to remove just the envelope icon from the indicator applet indicator-messages package has to be removed with sudo apt-get remove indicator-messages and then gnome-panel restarted with sudo pkill gnome-panel

    Running Java Applets on websites
    - icedtea-7-plugin solves this on Ubuntu 12.04.5, just like it does on 14.04.1.

    Reserving space for the top panel between monitors
    the same, except for the panel height. It is still 24 pixels, but when set with _NET_WM_STRUT_PARTIAL 1024,0,0,0,1024,1048,0,0,0,0,0,0 a single pixel space remains under it, so it has to be set with _NET_WM_STRUT_PARTIAL 1024,0,0,0,1024,1047,0,0,0,0,0,0

    Enable Compositing for Gnome Classic without effects
    In Trusty Thar Metacity Compositing can be enabled by opening dconf-editor and navigating to > org > gnome > metacity > compositing-manager > mark checked.
    In Precise Pangolin there is no such option in dconf-editor. Instead you'll have to install gconf-editor and set it there. Once installed, you can find it in the Applications menu > System Tools > Configuration Editor. Inside it navigate to apps > metacity > general and set a checkmark next to "compositing_manager"
    This will enable real window transparency (i.e. terminal window), window shadow, Alt+Tab window selector shows screenshot of the window; and it is said to support AWN, and Gnome Do, but I did not try these.

    Aero Snap for Gnome Classic (no effects)
    the same, except for the key combinations: in Ubuntu 12.04 instead of Mod4 + Super_L + Left combination it is only Mod4 + Left

    Repository download checklist:
    • synaptic
    • gnome-session-fallback
    • nautilus-open-terminal
    • wmctrl
    • xbindkeys
    • dconf-tools
    • gconf-editor
    • gimp (GUI image manipulation tool)
    • inkscape (GUI vector-based drawing program)
    • imagemagick (convert, mogrify, identify)
    • pdftk
    • pdfjam (pdfjoin)
    • djvulibre-bin (ddjvu, djvused, cjb2, djvm, c44)
    • potrace (mkbitmap)
    • unpaper
    • keepass2
    • keepassX
    • nautilus-dropbox (Dropbox) fails to complete installation.
    Web download checklist:
    to install deb packages run sudo dpkg --install [packagename.deb]
    to install packages with dependencies, install gdebi first from synaptic, then run sudo gdebi [packagename.deb] - gdebi is like Ubuntu Software Center ("USC") in the Command Line Interface ("CLI")
    • Dropbox: does not show system tray indicator in notification area (see description below)
    • Skype: looks all right.
    • Rescuetime: looks all right.
    • Plex Media Server: looks all right.
    • Google Chrome: looks all right.
    Dropbox installation troubles:
    - when installing nautilus-dropbox the process failed to move forward after downloading 100% of the dropbox installer. After killing this process somehow, I could not install anything, but got the message: "E: dpkg was interrupted, you must manually run 'sudo dpkg --configure -a' to correct the problem." So I did as was asked, and then nautilus-dropbox configuration continued with downloading the installer and stopping after 100% again. I could get out of this infinite loop by following the instructions in this post. I edited the /var/lib/dpkg/info/nautilus-dropbox.postinst file and inserted a "exit 0" line as the second line right after the "#!" line. Then dpkg could finish the process by quitting without really configuring dropbox, so after this I removed the whole thing with sudo apt-get remove nautilus-dropbox and intalled the deb package downloaded from dropbox site.
    - the deb package installed all right, but the dropbox tray icon is missing from the notification area. I searched for a solution, and some places suggest removing dropbox and installing nautilus-dropbox instead, but this obviously will not work for me. Another post is suggesting more ways to get the icon working, and I tried all of it (notification area, unity-panel whitelist, autostart y), but none of them worked.
    - I added the dropbox gpg key to the repositiry, did an apt-get update, and than tried to install nautilus-dropbox, but got the message: "Some packages could not be installed. This may mean that you have requested an impossible situation or if you are using the unstable distribution that some required packages have not yet been created or been moved out of Incoming. The following information may help to resolve the situation: The following packages have unmet dependencies:  nautilus-dropbox : Depends: dropbox but it is not going to be installed E: Unable to correct problems, you have held broken packages." So I searched, and found, and did an apt-get upgrade, which upgraded dropbox only, because this was the broken package, and then after restarting dropbox, nautilus and gnome-panel, there was this 1x1 pixel white dot in the notification area, which on mouse-over shows a label "Dropbox 3.0.5 Up to date" and can be right-clicked to reach dropbox menu. Nautilus-dropbox is still not installed as a package.
    - when I copied the dropbox icons to the icon fallback directory, the dropbox icon showed up on the panel.
    Dropbox icons are stored in the /home/[user]/.dropbox-dist/dropbox-[version]/images/hicolor/16x16/status/
    Icon fallback directory for them is /usr/share/icons/hicolor/16x16/status/
    However, after restarting the panel it was only the 1x1 pixel dot again, and restarting dropbox didn't help. Icons are still there in the fallback directory.
    A note: Skype puts it's icon next to the Dropbox pixel, and it works perfectly, so the problem is definitely with Dropbox.

    2015. január 17.

    Migrating from Ubuntu 14.04.1 LTS to 12.04.5 LTS

    I decided to abandon Ubuntu Trusty Thar LST after about two weeks of usage. I was pretty upset about it. This is what I wrote when I made the decision:
    I actually have to do paid work on my laptop, so it needs to be as reliable and as fast as possible.
    Ubuntu Trusty with gnome session flashback was great. Really. The only little tiny problem was that it lasted only until I had to really depend on it because of my job. My job, that is 99% spreadsheet and internet browser work. Opening 10-20 chrome windows during a single search process takes all the memory, and freezes the system. Firefox is not really that better than chrome in memory usage. And Libreoffice... the spreadsheet I work with is like 2000 rows by 40 columns data and another 6 sheets of database queries made with functions. Libreoffice just could not handle this. It was terribly slow, lagging when scrolling, saving took up to a minute, and all 4.x versions crashed regularly.
    No, this is not something anyone would recommend to do your job on. Not in 2015.
     I was planning to abandon Ubuntu at all, and choose a lightweight alternative, probably one that is based on Ubuntu. Then I realized Ubuntu Precise Pangolin is supported up to 2017, so I thought I'll give it a try before completely saying good-bye to Ubuntu.

    I set up a similar environment as on Trusty. In Precise, it is gnome-session-fallback that gives back the Gnome2 environment. It can be downloaded from Synaptic Package Manager, which can be downloaded with the sudo apt-get install synaptic command in the Terminal, which can be opened with the Ctrl+Alt+T command.