I ran into a couple of problems while trying to install the new LTS on my HPQ TC4400 laptop.
It had the 12.04 LTS installed, and had the home directory on a separate partition.
1. problem: no booting from pendrive
I tried different pendrives (2, 4, 8 GB), different USB slots (there are 3 on my machine) and different Ubuntu versions (12.04, 14.04, 16.04).
The problem I ran into is this:
gfxboot.c32: not a COM32R image
So first I tried to create startup disks on my desktop 12.04 on different pendrives with 16.04 and 14.04 images. They all resulted in this error. I went with the "live" command for 16.04. But one pendrive did not even start up the live session, while another did. Once I was in live, I tried to install 16.04, with the same distribution of the hard drives as I had before. It seemed to be okay. However when I started it and logged in, the system never loaded. Instead I got this disrupted background image flashing in different resolutions for until I had enough and turned off the machine.
Next I tried creating the startup discs on the 16.04 live session. The 14.04 pendrive booted alright compared to the one created on 12.04, but then the installation failed, and then booting also wasn't smooth anymore.
Next I reinstalled the 12.04, however it had issues with settings already existing on the home partition. The system did not load properly throwing errors in ma face.
Luckily I just got a spare 500GB hard drive, switched it with the old one and went again for 16.04 with the strange boot interface typing "live" in, and then installing from the live session.
It turned out okay so far.
My conclusion is that the settings in the home partition somehow interfered with the newly installed OSs, but really I have no clue what happened and why.
A következő címkéjű bejegyzések mutatása: 64-bit. Összes bejegyzés megjelenítése
A következő címkéjű bejegyzések mutatása: 64-bit. Összes bejegyzés megjelenítése
2017. február 19.

2016. január 19.
Out of 4GB RAM only 3.3GB is usable
Yesterday I bought a 2GB RAM to upgrade my HPQ TC4400 to the maximum allowed memory: 4GB. Before that I had 2+1GB installed, showing up as 2.9GB.
This 2+2GB RAM however shows up only as 3.3GB. Wow. Only 0.4GB increase. So I started to look around for the WHY?!?
Probably useful links:
Another important note is that the BIOS is already the latest (Version: 68YHV Ver. F.0C; Release Date: 07/09/2008); It does not have an option for Memory Hole Remapping; The processor is Intel Pentium M Core2 CPU T5600 @ 1.83GHz and it does have a PAE (Physical address extension) flag (according to dmidecode).
I definitely have a 64-bit operating system, so the limitation cannot be due to a 32-bit OS.
The maximum capacity is 4GB:
I do have 4GB installed:
However, there is only ~3.3GB available:
Free shows the same:
DMSG log has more detailed info:
There is something else interesting in /var/log/dmesg (opened it with gedit)
The same information can be found here:
And then, 'smem' shows that there is ~700K reserved for the firmware/hardware... but WHY? (the "Used" amount sums up to 4194304 below)
In comparison, when 3GB memory is in the machine, the numbers are like this:
I also tried running Ubuntu from an USB pendrive, but it shows the same amount of memory. And I tried running Windows 7, and this also shows only 3,3GB.
According to this article (http://duartes.org/gustavo/blog/post/getting-physical-with-memory/), "some of the physical memory range in an Intel computer is mapped to devices like hard drives and network cards instead of actual RAM memory. This allows drivers to communicate with their devices by writing to and reading from memory. The kernel marks these memory regions as uncacheable in the page tables." Then in the article about the Memory Map (http://duartes.org/gustavo/blog/post/motherboard-chipsets-memory-map/) it is said that "this mapping of memory addresses away from RAM modules causes the classic hole in PC memory between 640KB and 1MB. A bigger hole arises when memory addresses are reserved for video cards and PCI devices." "The diagram below shows a typical memory map for the first 4 gigs of physical memory addresses in an Intel PC:"
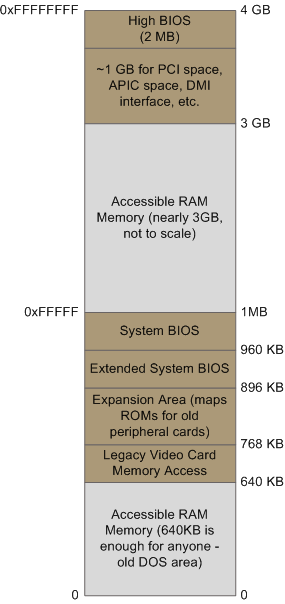 Then it is said that "the CPU mode determines how much physical memory can be accessed. For example, if the CPU is running in 32-bit mode, then it is only capable of physically addressing 4 GB (well, there is an exception called physical address extension, but ignore it for now). Since the top 1 GB or so of physical addresses are mapped to motherboard devices the CPU can effectively use only ~3 GB of RAM. [...] On the other hand, a CPU running in 64-bit mode can physically access 64GB (few chipsets support that much RAM though). In 64-bit mode it is possible to use physical addresses above the total RAM in the system to access the RAM regions that correspond to physical addresses stolen by motherboard devices. This is called reclaiming memory and it’s done with help from the chipset."
My conclusion is that there is no way to access all the 4GB of memory as RAM.
This 2+2GB RAM however shows up only as 3.3GB. Wow. Only 0.4GB increase. So I started to look around for the WHY?!?
Probably useful links:
- There is actually a post about TC4400 here: http://forum.notebookreview.com/threads/tc4400-only-recognizes-3447mb-in-windows.225619/ It concludes that it was Windows' fault, and it needed an upgrade.
- More useful info for linux: http://superuser.com/questions/453201/only-3-2gb-of-4gb-ram-detected-on-64-bit-debian
- Here they suggest to reinstall the 64-bit system: http://askubuntu.com/questions/32272/why-does-ubuntu-only-show-3gb-of-ram
Another important note is that the BIOS is already the latest (Version: 68YHV Ver. F.0C; Release Date: 07/09/2008); It does not have an option for Memory Hole Remapping; The processor is Intel Pentium M Core2 CPU T5600 @ 1.83GHz and it does have a PAE (Physical address extension) flag (according to dmidecode).
I definitely have a 64-bit operating system, so the limitation cannot be due to a 32-bit OS.
~$ uname -a
Linux 3.13.0-74-generic #118~precise1-Ubuntu SMP Fri Dec 18 10:38:55 UTC 2015 x86_64 x86_64 x86_64 GNU/Linux
The maximum capacity is 4GB:
~$ sudo dmidecode --type 16
# dmidecode 2.11
SMBIOS 2.4 present.
Handle 0x000A, DMI type 16, 15 bytes
Physical Memory Array
 Location: System Board Or Motherboard
 Use: System Memory
 Error Correction Type: None
 Maximum Capacity: 4 GB
 Error Information Handle: No Error
 Number Of Devices: 2
I do have 4GB installed:
~$ sudo dmidecode --type 19
# dmidecode 2.11
SMBIOS 2.4 present.
Handle 0x000D, DMI type 19, 15 bytes
Memory Array Mapped Address
 Starting Address: 0x00000000000
 Ending Address: 0x000FFFFFFFF
 Range Size: 4 GB
 Physical Array Handle: 0x000A
 Partition Width: 2
However, there is only ~3.3GB available:
~$ cat /proc/meminfo | grep "MemTotal"
MemTotal:        3460508 kB
Free shows the same:
~$ free -m
             total       used       free     shared    buffers     cached
Mem:          3379       2673        705          0        346       1109
-/+ buffers/cache:       1217       2161
Swap:         4881          0       4881
DMSG log has more detailed info:
~$ cat /var/log/dmesg | grep "Memory"
[    0.000000] Memory: 3439500K/3530168K available (7639K kernel code, 1140K rwdata, 3512K rodata, 1360K init, 1448K bss, 90668K reserved)
[   15.528520] [drm] Memory usable by graphics device = 256M
There is something else interesting in /var/log/dmesg (opened it with gedit)
[    0.000000] x86 PAT enabled: cpu 0, old 0x7040600070406, new 0x7010600070106
[    0.000000] original variable MTRRs
[    0.000000] reg 0, base: 0GB, range: 2GB, type WB
[    0.000000] reg 1, base: 2GB, range: 1GB, type WB
[    0.000000] reg 2, base: 3GB, range: 256MB, type WB
[    0.000000] reg 3, base: 3328MB, range: 128MB, type WB
[    0.000000] reg 4, base: 64888MB, range: 8MB, type UC
[    0.000000] reg 5, base: 4175488KB, range: 128KB, type UC
[    0.000000] total RAM covered: 3456M
[    0.000000] Found optimal setting for mtrr clean up
[    0.000000]  gran_size: 64K  chunk_size: 1G  num_reg: 3   lose cover RAM: 0G
[    0.000000] New variable MTRRs
[    0.000000] reg 0, base: 0GB, range: 4GB, type WB
[    0.000000] reg 1, base: 3456MB, range: 128MB, type UC
[    0.000000] reg 2, base: 3584MB, range: 512MB, type UC
The same information can be found here:
~$ cat /proc/mtrr
reg00: base=0x000000000 (    0MB), size= 4096MB, count=1: write-back
reg01: base=0x0d8000000 ( 3456MB), size=  128MB, count=1: uncachable
reg02: base=0x0e0000000 ( 3584MB), size=  512MB, count=1: uncachable
And then, 'smem' shows that there is ~700K reserved for the firmware/hardware... but WHY? (the "Used" amount sums up to 4194304 below)
~$ smem -R 4G -w
Area                           Used      Cache   Noncache
firmware/hardware            733796          0     733796
kernel image                      0          0          0
kernel dynamic memory       1827468    1718276     109192
userspace memory            1180160     207332     972828
free memory                  452880     452880          0
In comparison, when 3GB memory is in the machine, the numbers are like this:
~$ smem -R 3G -w
Area                           Used      Cache   Noncache
firmware/hardware             72292          0      72292
kernel image                      0          0          0
kernel dynamic memory       2324328    2228148      96180
userspace memory             648196     164924     483272
free memory                  100912     100912          0
~$ free -m
total used free shared buffers cached
Mem: 3001 2919 81 0 26 2164
-/+ buffers/cache: 727 2273
Swap: 4881 0 4881
[    0.000000] x86 PAT enabled: cpu 0, old 0x7040600070406, new 0x7010600070106
[    0.000000] original variable MTRRs
[    0.000000] reg 0, base: 0GB, range: 2GB, type WB
[    0.000000] reg 1, base: 2GB, range: 1GB, type WB
[    0.000000] reg 2, base: 64504MB, range: 8MB, type UC
[    0.000000] reg 3, base: 4175488KB, range: 128KB, type UC
[    0.000000] total RAM covered: 3072M
[    0.000000] Found optimal setting for mtrr clean up
[    0.000000]  gran_size: 64K  chunk_size: 64K  num_reg: 2   lose cover RAM: 0G
[    0.000000] New variable MTRRs
[    0.000000] reg 0, base: 0GB, range: 2GB, type WB
[    0.000000] reg 1, base: 2GB, range: 1GB, type WB
I also tried running Ubuntu from an USB pendrive, but it shows the same amount of memory. And I tried running Windows 7, and this also shows only 3,3GB.
According to this article (http://duartes.org/gustavo/blog/post/getting-physical-with-memory/), "some of the physical memory range in an Intel computer is mapped to devices like hard drives and network cards instead of actual RAM memory. This allows drivers to communicate with their devices by writing to and reading from memory. The kernel marks these memory regions as uncacheable in the page tables." Then in the article about the Memory Map (http://duartes.org/gustavo/blog/post/motherboard-chipsets-memory-map/) it is said that "this mapping of memory addresses away from RAM modules causes the classic hole in PC memory between 640KB and 1MB. A bigger hole arises when memory addresses are reserved for video cards and PCI devices." "The diagram below shows a typical memory map for the first 4 gigs of physical memory addresses in an Intel PC:"
My conclusion is that there is no way to access all the 4GB of memory as RAM.
2015. február 19.
Using NCX-generator on Wine
NCX-generator is a Windows Command Line Interface utility to prepare e-books for processing with Kindlegen.
ncx-generator can be used through Wine. It requires .NET Framework 4 to be installed.
ncx-generator have to be run through Wine's Console User Interface (
This is the help file:
The difference between the Ubuntu Terminal and the WineConsole is, that you cannot use the TAB to fill in the filenames for you, and you have to refer to directories in your actual directory with a ./directory_name/ instead of using simply directory_name/ as in the Ubuntu Terminal.
To run the Windows Command Line Interface run wineconsole cmd
To run do this without opening the Windows Command Line Interface, just run the command through WineConsole, as if you were using the Windows CLI. This way it is possible to use the TAB to fill in filenames, which is a pleasure. The Windows CLI will be opened by WineConsole to run the command, and be closed when the running ends. If the user is prompted for keyboard input, the Windows CLI will stay open and wait for the user input.
This way NCX-generator can be integrated into bash scripts :)
Running a command like the above (with -a option) having a
NOTE: if you name the cover image Cover.jpg, and put it in the same directory as the book HTML, it will be automatically recognized and included properly in the OPF file, when you run ncxGen. By specifying the --author and --title options too, you will not have to edit the OPF manually at all before building your book with KindleGen.
However, some UTF-8 characters are not properly recognized in ncxGen, so if you use i.e. Hungarian characters like ő or ű in the title, toc-title or author, you'd better check the OPF and correct it.
ncx-generator can be used through Wine. It requires .NET Framework 4 to be installed.
ncx-generator have to be run through Wine's Console User Interface (
wineconsole - installed with the wine package).This is the help file:
ncxgen [options] filename

  -h, -?, --help             Display this help.
      --toc                  Generate the html Table of Contents.
      --ncx                  Generate the NCX Global Navigation.
      --opf                  Create the opf file package.
  -a, --all                  Create both html ToC, ncx and opf files.
  -q, --query=VALUE          The XPath query to find the ToC items. Use
                               multiple times to add levels in the ToC.
  -l, --level=VALUE          Number of levels to collapse to generate the NCX
                               file - used with -ncx or -all.
  -e                         Place the generated TOC at the end of the book
      --toc-title=VALUE      Name of the Table of Contents
      --author=VALUE         Author name.
      --title=VALUE          Book title.
  -v, --verbose              Turn on verbose output
  -i                         Convert <PRE class='image'> tages to PNG images
      --overwrite            Overwrite files without any prompt

Example:
         "ngen.exe -all -q "//h1" -q "//h2[@class='toc']" source.xhtml"
This expression will parse the xhtml file source.xhtml looking for the tag h1 an
d the tag h2 with an attribute class set to 'toc'. It will then create the html
 Table of Contents, the NCX Global Navigation file and the OPF file using the it
ems found.
The difference between the Ubuntu Terminal and the WineConsole is, that you cannot use the TAB to fill in the filenames for you, and you have to refer to directories in your actual directory with a ./directory_name/ instead of using simply directory_name/ as in the Ubuntu Terminal.
To run the Windows Command Line Interface run wineconsole cmd
To run do this without opening the Windows Command Line Interface, just run the command through WineConsole, as if you were using the Windows CLI. This way it is possible to use the TAB to fill in filenames, which is a pleasure. The Windows CLI will be opened by WineConsole to run the command, and be closed when the running ends. If the user is prompted for keyboard input, the Windows CLI will stay open and wait for the user input.
~$ wineconsole ncxGen.0.2.6.exe -a -q "//h1" --author="Book Author Name" --title="Book Title" --toc-title="TOC Title" ./Test_Book/Book.html
This way NCX-generator can be integrated into bash scripts :)
Running a command like the above (with -a option) having a
Book.html and a Cover.jpg to begin with, will create the following files in the file directory:Book.ncx
Booktoc.html
Book.opf
Bookout.html
NOTE: if you name the cover image Cover.jpg, and put it in the same directory as the book HTML, it will be automatically recognized and included properly in the OPF file, when you run ncxGen. By specifying the --author and --title options too, you will not have to edit the OPF manually at all before building your book with KindleGen.
However, some UTF-8 characters are not properly recognized in ncxGen, so if you use i.e. Hungarian characters like ő or ű in the title, toc-title or author, you'd better check the OPF and correct it.
2015. január 19.
Some trouble I experience with Ubuntu 12.04 and Gnome Classic w/o effects
- nautilus crash on removing external drives
- window shadows are partially left behind after the window was moved or closed
- after awaken from suspended mode, pressing the ctrl key caused a change in the display settings on a dual monitor setup. Each time the ctrl key was pressed the display setting changed between 1. extended displays 2. mirrored displays 3. one display turned off.
- in Firefox, Google applications tend to freeze for like 20 seconds and don't register clicks
2015. január 18.
Gnome Classic tweaks on Ubuntu 12.04.5 Precise Pangolin compared to 14.04.1 Trusty Thar
In this post I'm going to configure Ubuntu 12.04.5. LTS to my taste. Since I configured a 14.04.1 LTS just a couple of weeks ago the exact same way, I will compare the how-to of these settings.
What do I need from Ubuntu?
- this post has the list of features I'm going to test against Precise Pangolin.
Desktop Environment Choices
- I chose Gnome Flashback Services again, but in 12.04 it is called Gnome Classic (with or without effects) and can be installed by installing the package gnome-session-fallback instead of gnome-session-flashback.
- Synaptic package manager is not installed by default on 12.04, just like on 14.04, so it has to be installed from terminal with the sudo apt-get install synaptic command (or probably from Ubuntu Software Center, which I prefer to not use)
All the following notes are based on using Gnome Classic without Effects.
Setting up everything
Gnome Classic is somewhat different from Gnome Session Flashback.
Some useful tips can be found in this ubuntu forum thread.
Otherwise, compared to Ubuntu 14.04:
Changing the Date and Time format in the indicator applet
- on Precise there is no configuration editor pre-installed.
- DConf Editor can be installed by installing dconf-tools - then it will be available as dconf-editor of from the Applications menu > System Tools > DConf Editor
- after installing it, setting custom date and time format can be done as in Trusty, described in the post linked above.
Indicator Applet
- Gnome Classic installs indicator-applet-complete, but there are more then one indicator applet that can be downloaded with synaptic. The difference between them is this:
Remove messaging envelope from indicator applet
This AskUbuntu post holds the solution: to remove just the envelope icon from the indicator applet indicator-messages package has to be removed with
Running Java Applets on websites
- icedtea-7-plugin solves this on Ubuntu 12.04.5, just like it does on 14.04.1.
Reserving space for the top panel between monitors
the same, except for the panel height. It is still 24 pixels, but when set with
Enable Compositing for Gnome Classic without effects
In Trusty Thar Metacity Compositing can be enabled by opening dconf-editor and navigating to > org > gnome > metacity > compositing-manager > mark checked.
In Precise Pangolin there is no such option in dconf-editor. Instead you'll have to install gconf-editor and set it there. Once installed, you can find it in the Applications menu > System Tools > Configuration Editor. Inside it navigate to apps > metacity > general and set a checkmark next to "compositing_manager"
This will enable real window transparency (i.e. terminal window), window shadow, Alt+Tab window selector shows screenshot of the window; and it is said to support AWN, and Gnome Do, but I did not try these.
Aero Snap for Gnome Classic (no effects)
the same, except for the key combinations: in Ubuntu 12.04 instead of
Repository download checklist:
to install deb packages run
to install packages with dependencies, install
- when installing nautilus-dropbox the process failed to move forward after downloading 100% of the dropbox installer. After killing this process somehow, I could not install anything, but got the message: "E: dpkg was interrupted, you must manually run 'sudo dpkg --configure -a' to correct the problem." So I did as was asked, and then nautilus-dropbox configuration continued with downloading the installer and stopping after 100% again. I could get out of this infinite loop by following the instructions in this post. I edited the /var/lib/dpkg/info/nautilus-dropbox.postinst file and inserted a "exit 0" line as the second line right after the "#!" line. Then dpkg could finish the process by quitting without really configuring dropbox, so after this I removed the whole thing with sudo apt-get remove nautilus-dropbox and intalled the deb package downloaded from dropbox site.
- the deb package installed all right, but the dropbox tray icon is missing from the notification area. I searched for a solution, and some places suggest removing dropbox and installing nautilus-dropbox instead, but this obviously will not work for me. Another post is suggesting more ways to get the icon working, and I tried all of it (notification area, unity-panel whitelist, autostart y), but none of them worked.
- I added the dropbox gpg key to the repositiry, did an apt-get update, and than tried to install nautilus-dropbox, but got the message: "Some packages could not be installed. This may mean that you have requested an impossible situation or if you are using the unstable distribution that some required packages have not yet been created or been moved out of Incoming. The following information may help to resolve the situation: The following packages have unmet dependencies: nautilus-dropbox : Depends: dropbox but it is not going to be installed E: Unable to correct problems, you have held broken packages." So I searched, and found, and did an apt-get upgrade, which upgraded dropbox only, because this was the broken package, and then after restarting dropbox, nautilus and gnome-panel, there was this 1x1 pixel white dot in the notification area, which on mouse-over shows a label "Dropbox 3.0.5 Up to date" and can be right-clicked to reach dropbox menu. Nautilus-dropbox is still not installed as a package.
- when I copied the dropbox icons to the icon fallback directory, the dropbox icon showed up on the panel.
Dropbox icons are stored in the /home/[user]/.dropbox-dist/dropbox-[version]/images/hicolor/16x16/status/
Icon fallback directory for them is /usr/share/icons/hicolor/16x16/status/
However, after restarting the panel it was only the 1x1 pixel dot again, and restarting dropbox didn't help. Icons are still there in the fallback directory.
A note: Skype puts it's icon next to the Dropbox pixel, and it works perfectly, so the problem is definitely with Dropbox.
What do I need from Ubuntu?
- this post has the list of features I'm going to test against Precise Pangolin.
Desktop Environment Choices
- I chose Gnome Flashback Services again, but in 12.04 it is called Gnome Classic (with or without effects) and can be installed by installing the package gnome-session-fallback instead of gnome-session-flashback.
- Synaptic package manager is not installed by default on 12.04, just like on 14.04, so it has to be installed from terminal with the sudo apt-get install synaptic command (or probably from Ubuntu Software Center, which I prefer to not use)
All the following notes are based on using Gnome Classic without Effects.
Setting up everything
Gnome Classic is somewhat different from Gnome Session Flashback.
Some useful tips can be found in this ubuntu forum thread.
Otherwise, compared to Ubuntu 14.04:
- HP Compaq TC4400 native features:
- pen features: the same
- screen rotation: the same
- on-screen buttons: the same
- Terminal: the same
- Workspaces: the same
- Panels: the same
- Synaptic: the same
- File manager: Nautilus still can do all I want, so I'll stick with it.
- Scripts: the same
- Open in Terminal: the same (install nautilus-open-terminal package to get right click option "Open Terminal")
- xinput has a new version, and it enables to map the tablet input device to the tablet screen by using xinput --map-to-crtc device crtc
- where device is the device ID of the stylus or the eraser taken from xinput --list
- and the crtc is the name of the tablet monitor taken from xrandr
- on Precise there is no configuration editor pre-installed.
- DConf Editor can be installed by installing dconf-tools - then it will be available as dconf-editor of from the Applications menu > System Tools > DConf Editor
- after installing it, setting custom date and time format can be done as in Trusty, described in the post linked above.
Indicator Applet
- Gnome Classic installs indicator-applet-complete, but there are more then one indicator applet that can be downloaded with synaptic. The difference between them is this:
- indicator-applet-complete is: messaging applications, power settings, bluetooth settings, network settings, sound settings, date and time settings, user accounts, session management
- indicator-applet is: messaging applications, power settings, bluetooth settings, network settings, sound settings
- indicator-applet-session is: user accounts, session management
- indicator-applet-appmenu is: your active application's menu header
Remove messaging envelope from indicator applet
This AskUbuntu post holds the solution: to remove just the envelope icon from the indicator applet indicator-messages package has to be removed with
sudo apt-get remove indicator-messages and then gnome-panel restarted with sudo pkill gnome-panel Running Java Applets on websites
- icedtea-7-plugin solves this on Ubuntu 12.04.5, just like it does on 14.04.1.
Reserving space for the top panel between monitors
the same, except for the panel height. It is still 24 pixels, but when set with
_NET_WM_STRUT_PARTIAL 1024,0,0,0,1024,1048,0,0,0,0,0,0 a single pixel space remains under it, so it has to be set with _NET_WM_STRUT_PARTIAL 1024,0,0,0,1024,1047,0,0,0,0,0,0Enable Compositing for Gnome Classic without effects
In Trusty Thar Metacity Compositing can be enabled by opening dconf-editor and navigating to > org > gnome > metacity > compositing-manager > mark checked.
In Precise Pangolin there is no such option in dconf-editor. Instead you'll have to install gconf-editor and set it there. Once installed, you can find it in the Applications menu > System Tools > Configuration Editor. Inside it navigate to apps > metacity > general and set a checkmark next to "compositing_manager"
This will enable real window transparency (i.e. terminal window), window shadow, Alt+Tab window selector shows screenshot of the window; and it is said to support AWN, and Gnome Do, but I did not try these.
Aero Snap for Gnome Classic (no effects)
the same, except for the key combinations: in Ubuntu 12.04 instead of
Mod4 + Super_L + Left combination it is only Mod4 + LeftRepository download checklist:
- synaptic
- gnome-session-fallback
- nautilus-open-terminal
- wmctrl
- xbindkeys
- dconf-tools
- gconf-editor
- gimp (GUI image manipulation tool)
- inkscape (GUI vector-based drawing program)
- imagemagick (convert, mogrify, identify)
- pdftk
- pdfjam (pdfjoin)
- djvulibre-bin (ddjvu, djvused, cjb2, djvm, c44)
- potrace (mkbitmap)
- unpaper
- keepass2
- keepassX
nautilus-dropbox (Dropbox)fails to complete installation.
to install deb packages run
sudo dpkg --install [packagename.deb]to install packages with dependencies, install
gdebi first from synaptic, then run sudo gdebi [packagename.deb] - gdebi is like Ubuntu Software Center ("USC") in the Command Line Interface ("CLI")- Dropbox: does not show system tray indicator in notification area (see description below)
- Skype: looks all right.
- Rescuetime: looks all right.
- Plex Media Server: looks all right.
- Google Chrome: looks all right.
- when installing nautilus-dropbox the process failed to move forward after downloading 100% of the dropbox installer. After killing this process somehow, I could not install anything, but got the message: "E: dpkg was interrupted, you must manually run 'sudo dpkg --configure -a' to correct the problem." So I did as was asked, and then nautilus-dropbox configuration continued with downloading the installer and stopping after 100% again. I could get out of this infinite loop by following the instructions in this post. I edited the /var/lib/dpkg/info/nautilus-dropbox.postinst file and inserted a "exit 0" line as the second line right after the "#!" line. Then dpkg could finish the process by quitting without really configuring dropbox, so after this I removed the whole thing with sudo apt-get remove nautilus-dropbox and intalled the deb package downloaded from dropbox site.
- the deb package installed all right, but the dropbox tray icon is missing from the notification area. I searched for a solution, and some places suggest removing dropbox and installing nautilus-dropbox instead, but this obviously will not work for me. Another post is suggesting more ways to get the icon working, and I tried all of it (notification area, unity-panel whitelist, autostart y), but none of them worked.
- I added the dropbox gpg key to the repositiry, did an apt-get update, and than tried to install nautilus-dropbox, but got the message: "Some packages could not be installed. This may mean that you have requested an impossible situation or if you are using the unstable distribution that some required packages have not yet been created or been moved out of Incoming. The following information may help to resolve the situation: The following packages have unmet dependencies: nautilus-dropbox : Depends: dropbox but it is not going to be installed E: Unable to correct problems, you have held broken packages." So I searched, and found, and did an apt-get upgrade, which upgraded dropbox only, because this was the broken package, and then after restarting dropbox, nautilus and gnome-panel, there was this 1x1 pixel white dot in the notification area, which on mouse-over shows a label "Dropbox 3.0.5 Up to date" and can be right-clicked to reach dropbox menu. Nautilus-dropbox is still not installed as a package.
- when I copied the dropbox icons to the icon fallback directory, the dropbox icon showed up on the panel.
Dropbox icons are stored in the /home/[user]/.dropbox-dist/dropbox-[version]/images/hicolor/16x16/status/
Icon fallback directory for them is /usr/share/icons/hicolor/16x16/status/
However, after restarting the panel it was only the 1x1 pixel dot again, and restarting dropbox didn't help. Icons are still there in the fallback directory.
A note: Skype puts it's icon next to the Dropbox pixel, and it works perfectly, so the problem is definitely with Dropbox.
2015. január 17.
Migrating from Ubuntu 14.04.1 LTS to 12.04.5 LTS
I decided to abandon Ubuntu Trusty Thar LST after about two weeks of usage. I was pretty upset about it. This is what I wrote when I made the decision:
I set up a similar environment as on Trusty. In Precise, it is
I actually have to do paid work on my laptop, so it needs to be as reliable and as fast as possible.I was planning to abandon Ubuntu at all, and choose a lightweight alternative, probably one that is based on Ubuntu. Then I realized Ubuntu Precise Pangolin is supported up to 2017, so I thought I'll give it a try before completely saying good-bye to Ubuntu.
Ubuntu Trusty with gnome session flashback was great. Really. The only little tiny problem was that it lasted only until I had to really depend on it because of my job. My job, that is 99% spreadsheet and internet browser work. Opening 10-20 chrome windows during a single search process takes all the memory, and freezes the system. Firefox is not really that better than chrome in memory usage. And Libreoffice... the spreadsheet I work with is like 2000 rows by 40 columns data and another 6 sheets of database queries made with functions. Libreoffice just could not handle this. It was terribly slow, lagging when scrolling, saving took up to a minute, and all 4.x versions crashed regularly.
No, this is not something anyone would recommend to do your job on. Not in 2015.
I set up a similar environment as on Trusty. In Precise, it is
gnome-session-fallback that gives back the Gnome2 environment. It can be downloaded from Synaptic Package Manager, which can be downloaded with the sudo apt-get install synaptic command in the Terminal, which can be opened with the Ctrl+Alt+T command.
2015. január 8.
Ubuntu 14.04 LTS (64-bit) Trusty Thar personalization
Your options for a Desktop Environment are:
- Unity (Ubuntu default)
- Gnome (3) (install from Software Center)
- Gnome (2) Flashback Services (install from Software Center) - use it with Metacity
- LifeHacker's Linux Desktop Faceoff: GNOME 3 Shell vs Ubuntu Unity helps to choose between Unity and Gnome 3
- This ubuntuforum post helps you customize Unity to get back some of the Gnome2 features you're used to.
- This blogpost helps you customize Unity further.
- This blogpost helps you get rid of Unity completely (this can be risky according to the comments) and get back to a Gnome2 style interface.
- This blogpost helps you get back to a Gnome2 style interface without removing Unity.
Migrating from Ubuntu 10.04 LTS Lucid Lynx to 14.04 LTS Trusty Thar on HP Compaq TC4400 Tablet PC
For these 4 years I sticked with Lucid Lynx despite the lessening support and the increasing complications and deficiencies, because of the beloved Gnome2 interface and all the customization I made throughout the years I used it.
However, Lucid Lynx is not supported anymore, and the difficulties this bare fact caused me recently reached my limits.
I backed up all my data and profile files to an external hard drive, and erased the whole hard disk to start anew.
I gave Ubuntu 20GB space for the system, 5GB for swap space, and put /home to a separate partition.
I installed the 64-bit version (finally, after 7 years of using the 32-bit version on my intel dual-core cpu because the first ubuntu distro I set on it still did not cover my needs on 64-bit) of Trusty Thar.
Now what's next is the personalization.
Will I stick with Gnome2, or will I migrate to Gnome3 or Unity?
What do I need from Ubuntu?
- it should work with the HP Compaq TC4400's native features.
- Pen features: pen, eraser, pen-button, pressure-sensitivity
- Screen rotation for pen usage
- Screen mapping for multi-screen setup
- Display side located buttons (scroll jog dial, ctrl-alt-del)
- Pen activated buttons on the side of the display (have never worked with Ubuntu previously)
- Fingerprint Sensor on the side of the display (I never tested it in Ubuntu previously)
- Ambient Light Sensor (I never tested it in Ubuntu previously)
- it should support the functionality of nautilus scripts and bash scripts
- it should allow full control over the system from terminal
- it should support easy access of software, applications, files and folders, without having to remember any name at all, so basically it should support easy, icon-based and menu-based navigation, where the user only has to remember visually and motorically to be able to locate anything. (menus to navigate through with keyboard or mouse)
- it should constantly give feedback about system performance (System Monitor in top panel)
- it should have a file manager (nautilus) that makes copying and moving files easy (2 panel view F3), have favorite places stored to reach them easily (bookmarks), have compact view with small icons that allow a lot to be seen at once (compact view). It is also great to have tree view, to make file moving/copying even easier.
- it should have multiple desktop workspaces available
- it should allow switching between running software by clicking with mouse
- it should have a software center that allows switching between software versions (synaptic)
- it should be light on my hardware
- it should support working intensively with large xlsx, xls and ods files with a lot of cells being functions.
- it should support opening a lot of web browser windows simultaneously
- it should work with these specific software:
- Dropbox
- Skype
- Rescuetime and Toggl
- keepass2 and keepassX
- Plex Media Server
- imagemagick, pdftk, mkbitmap, scanimage and other command line image manipulating tools I'm used to work with
2009. április 13.
2009. április 10.
cib.hu java small applet vs firefox and opera
After wasting nearly 10 hours total I finally got the youtube constantly working on 64-bit firefox (2).
However there is this site www.cib.hu which has this little button at the top-right side of the page under the title "CIB INTERNET BANK" called "Belépés". I just couldn't get the applet it opens to work.
I tried epiphany but the result was the same. I almost thought I had some problems with my ubuntu when I downloaded Opera and it worked like magic.
testing the battery again
Almost idle all the time it went around 10 hours today. I had some difficulties so I will try this kind of use tomorrow again.
2009. április 9.
Testing my new Ultra Capacity Travel Battery
I got this EJ092AA HP 12 cell Ultra-Capacity Travel Battery yesterday. I charged it for around 14 hours, and checked it out. My primary Battery was also fully charged.
I gave a hard time to them: CPU was running around 50% and memory around 30% all the time.
The result is a total of 4 hours (and 4 minutes) runtime with the 2 batteries used together.
Just in fact:
The 12 cell ultra-capacity battery adds + 0,803 kg-s to the 2,1 kg-s Alice already has. So it's nothing that you can call funny. I can hold it on one arm for no longer, and it gets out of balance because the weight is attached on the side and not everywhere. And it looks pretty awful too: the battery hangs out on the back 3 cm-s. I'll try to post some photos, to show it.
Positive is that I got a bunch of AC cables - every kind of specific country types.
I'm still thinking to send it back and buy some simple primary batteries as they are cheaper smaller and lighter. You only have to do a restart when changing them.
2009. március 30.
Notice: pdfnup --trim
It removes a given amount of margins on the side, with the syntax 'left bottom right top'.
2009. január 18.
How to change default application for a filetype?
Right click on the file, choose Properties, select Open with tab, change the application.
2009. január 15.
How to change your MAC Addresses
$ sudo gedit /etc/network/interfacesauto eth0
#iface eth0 inet dhcp
hwaddress ether UR:MA:CA:DD:RE:SS
to restart / stop /start networking:
$ sudo /etc/init.d/networking restart
$ sudo /etc/init.d/networking stop
$ sudo /etc/init.d/networking start
2009. január 3.
ImageMagick converting multiple files
*I do not use this method anymore, although it was a great start.*
After being a book-worm for half a day, I found out how can I write a working script to solve my imagemagick output problem.
It looks like this:
2.) copy paste the script
3.) save as anyname.sh
4.) make it executable
Usage:
1.) copy anyname.sh in the folder containing only the image files you want to make simple
2.) go (cd) to this folder in the terminal
3.) type ./anyname.sh
4.) wait and see.
How to convert this to pdf?
How to join these single-page pdfs?
After being a book-worm for half a day, I found out how can I write a working script to solve my imagemagick output problem.
It looks like this:
#!/bin/sh1.) open your favorite text editor
for i in `find -iname '*.jpg'`
do
convert $i -background white -flatten -colorspace Gray -negate -edge 1 -negate -normalize -sharpen 1 -threshold 50% -despeckle -blur 0x.5 -normalize +dither -posterize 8 gif:- >> $i.gif
done
2.) copy paste the script
3.) save as anyname.sh
4.) make it executable
Usage:
1.) copy anyname.sh in the folder containing only the image files you want to make simple
2.) go (cd) to this folder in the terminal
3.) type ./anyname.sh
4.) wait and see.
How to convert this to pdf?
mogrify -format pdf *.JPG
How to join these single-page pdfs?
pdfjoin *.pdf --outfile newname.pdf
2008. december 29.
ImageMagick
I gave up on tesseract, so now I'm modifying the photos I took to a smaller size, and attaching them in a PDF with gscan2pdf.
I installed ImageMagick with synaptic, and found the matching script on it's webpage.
I had to modify this script, because convert didn't find the
- input filename globbing (convert *.JPG [outputfilename])
- output filename references (convert *.jpg myimage-%d.jpg) which should produce myimage-1.jpg, myimage-2.jpg, etc.
However, the output just didn't want to work. It always gave me a single file: the last file. But the procedure was so long, I think the program did the work, just saved all the images over that one file.
To see if this is only because of the older version (2.4) of the program, I tried to install, the newest version(2.6). It installed well, however, something went wrong, and I got the following error while trying to use convert
I installed ImageMagick with synaptic, and found the matching script on it's webpage.
I had to modify this script, because convert didn't find the
-contrast-stretch.
Now it looks like this:
convert eredeti.JPG -background white -flatten -colorspace Gray -negate -edge 1 -negate -normalize -sharpen 1 -threshold 50% -despeckle -blur 0x.5 -normalize +dither -posterize 8 verzio_dit3.gifSince I want to modify a lot of images, I tried to do this simple, so I tried to use these tricks:
- input filename globbing (convert *.JPG [outputfilename])
- output filename references (convert *.jpg myimage-%d.jpg) which should produce myimage-1.jpg, myimage-2.jpg, etc.
However, the output just didn't want to work. It always gave me a single file: the last file. But the procedure was so long, I think the program did the work, just saved all the images over that one file.
To see if this is only because of the older version (2.4) of the program, I tried to install, the newest version(2.6). It installed well, however, something went wrong, and I got the following error while trying to use convert
error while loading shared libraries:libMagickCore.so.1Now I'm reinstalling, following these tips./configure LDFLAGS="-L/usr/local/lib -Wl,-rpath,/usr/local/lib"Installation was a success.
However, converting more files at once still doesn't work.
2008. december 15.
Cinelerra
Installing:
- Synaptic Package Manager: Settings -> Repositories.
Make sure you have universe, multiverse and restricted sources checked in the first tab.
Click on tab Third Party. Click on the Add button and enter your chosen repository (for me the next line):
(for AMD64 (and also Core Duo Intel64), by Valentina Messeri)
Clicking Add Source will display the new repository enabled in the Software Sources window.
You should now see Cinelerra in the list of packages available in Synaptic.
Follow Synaptic instructions for installation.
With Synaptic Package Manager:
Open the Software Sources Window:- Synaptic Package Manager: Settings -> Repositories.
Make sure you have universe, multiverse and restricted sources checked in the first tab.
Click on tab Third Party. Click on the Add button and enter your chosen repository (for me the next line):
deb http://giss.tv/~vale/ubuntu64 ./(for AMD64 (and also Core Duo Intel64), by Valentina Messeri)
Clicking Add Source will display the new repository enabled in the Software Sources window.
You should now see Cinelerra in the list of packages available in Synaptic.
Follow Synaptic instructions for installation.
2008. november 26.
Tesseract
Guided with the idea of language files not being separated in tesseract versions below 2.0, so that training will be not supported, I tried to install a newer version from source.
The winner was 2.01. with the ./configure, make and sudo make install it went well. I only had to install the language files manually. I downloaded the 2.00 language files, and overwrited the 0 byte files in the /user/local/share/tessdata.
Now it works fine. I only have to train it for Hungarian.
I also want to find an easier way to prepare the images...
Feliratkozás:
Megjegyzések (Atom)